Tuesday, March 19, 2013

Pigtails

This one's going out by request to "Old House Lover"...

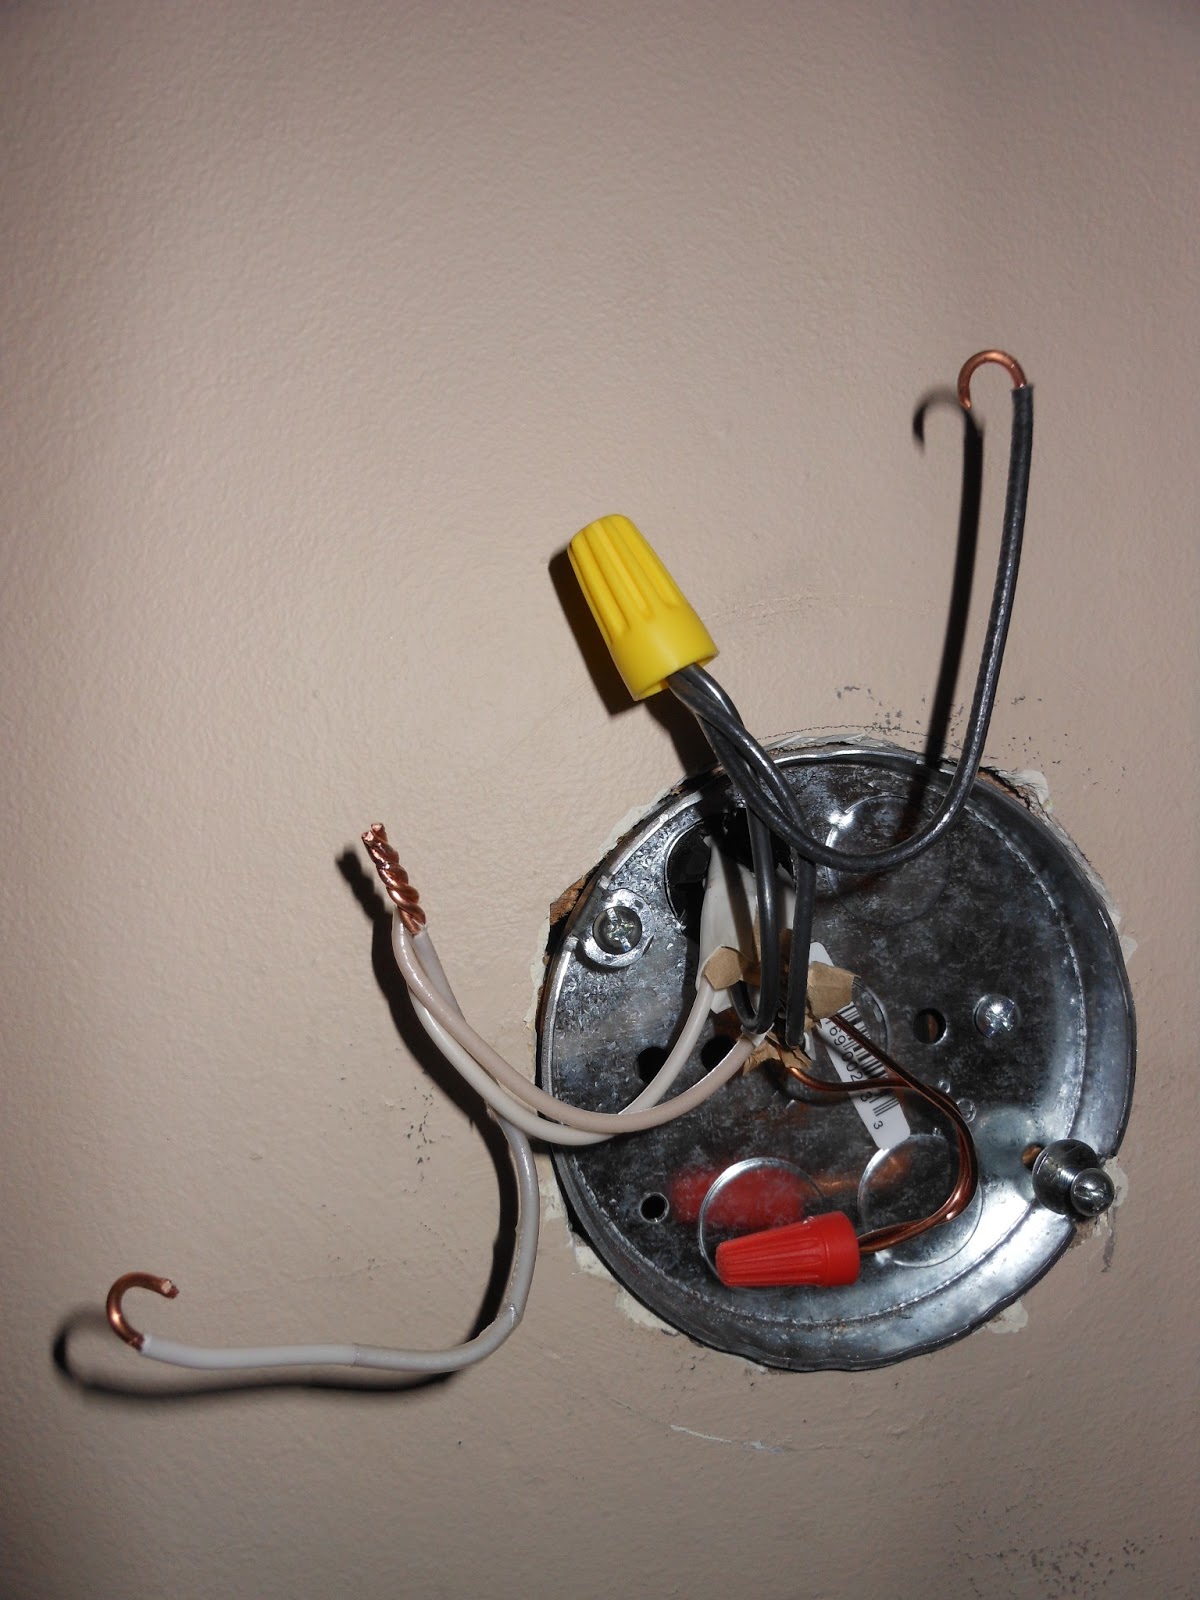
You want pigtails, you got pigtails.  These pigtails are going to be attached to screw terminals on a temporary exposed bulb light fixture.  So, I've pre-bent the end of each pigtail for the screw terminal.

The black wires show a pigtail that's done.  The incoming hot wire is twisted together with the outgoing hot wire and a hot pigtail.

The white wires show how they're twisted together before installing the wire nut.  The insulation ins stripped to the proper length on each wire.  The three wires are then twisted tightly together using a lineman's pliers.  If the ends of the wires don't line up post-twisting, then cut off the excess so they do.  In this one I got lucky and they all lined up.  

Note: Always twist the wires together - you'll get a better connection that won't come apart under slight wire movement or expansion/contraction due to changes in temperature.  (You do know that flowing electricity makes wires get hot, right?  ;-)  

You'd use this same setup if you were wiring an outlet in the middle of a run (except you'd have a pigtail for the ground wire as well).  Generally you want to do that so that a failure in the device/fixture doesn't cause  everything downstream to stop working also...

For the previous post, I didn't need the pigtail to connect a device with the incoming and outgoing wires.  Rather, the pigtail was just to extend the wire length.  In that case there was only one wire twisted together with the pigtail.

Disclaimer (I work with lots of lawyers and they won't be happy unless I add a disclaimer): I'm not an electrician. I don't play one on TV.  I didn't sleep at a Holiday Inn Express last night.  Use at your own risk.  Your mileage may vary.  Always turn off the breaker before working on a circuit.

Sunday, March 17, 2013

How not to do it...

While mucking about with the old electrical in the attic, I discovered this. It's an awesome piece of work.

This is in a junction box in the attic floor. Note that the box is filled with blown cellulose insulation. No fire hazard there...

The romex leads down to a switch in the room below. The single wire out the top is the hot feed. The single wire out the left side becomes hot when the switch is on and leads to the light fixture; somewhere it catches a neutral back to the panel. I have no idea where that is - knob and tube is awesome...

The orange wire nuts cap the pigtails that lead nowhere. I have no idea why they are there.

Lastly, note that the romex's ground doesn't exist. Actually, it's that the installer cut it. I guess that's what you do when you don't need it, you just cut it off.

So the next guy in with a grounded switch and fixture needs to run new wire...

Grrrr...


Tuesday, March 12, 2013

Attic Demolition

Things are moving pretty quickly.  The back part of the attic is mostly demolished.  Compare the before and after photos.  They are taken from the same spot looking towards the back of the house.

The bulk of the plaster has been removed already.  Much of the wall framing is gone.  The radiators and 99% of their pipes are removed.  99% of the electrical is gone.  Almost all of the insulation has been removed.

Next up is the stuff near the stair (where the light is shining in the after picture).  And, of course, the old flooring needs to come up.

Bill and Jhonny are doing the bulk of it; I'm just messing about with the electrical.  That means I get to start on the front of the house the next few nights while they finish up the heavy lifting in the back.

In theory the front will be easier because it has never been "finished" space - no plaster, just insulation.


Wednesday, March 6, 2013

The Attic Begins


We've been working our way through the spaces at the front of the house up to now.  Because we only have the spaces at the back of the house remaining, we need to do things in a bit more orderly fashion.  So now we're going top down.  Mostly that is to prevent expensive re-work later.  It would be silly to finish the kitchen and later poke holes in the walls because you need to run wiring or move the plumbing stack in the master bathroom above it.  And likewise with the master bath to change something in the attic above it.


So, the next big project on the list is the attic.  I'll be updating the slideshow with new photos periodically.  It already contains before photos along with demolition photos from day 1.

The two floor plans I've attached show the existing layout.  The top one shows the "cold" attic at the front of the house.  It's the large unfinished room in the photos.  Most people are surprised when they get up there; from the street it doesn't look like the space is that big or that the ceiling is as high as it is.  It doesn't really feel cramped like a typical attic space.

The curved wall on the drawing's left is the curved wall in the main staircase.  The one on the drawing's right is the curved wall in the dining room and master bedroom.

The second floor plan shows the layout at the back of the house.  It contains the two servant bedrooms and a small servant bathroom.  The doorway at the end of the hall (top of the drawing) is the doorway into the the front room.

The demolition has already revealed some interesting things (but nothing valuable!):

The studs in the hall walls are oriented perpendicular to what you'd normally expect.  I'm not sure why other than to gain a bit of extra space, because the other studs are oriented normally.

All the electrical is run in conduit.

The plaster is a "blue board" sort of product.  You can see in one picture that the board is only about 2 feet wide and run horizontally on the wall.  It's covered with a fairly thick coat of sand textured plaster.

There are also some places on the brick where you can see quite a bit of soot from the attic fire in the 1940s.

Because we know the attic was gutted by the fire, we know it's not original.  So we don't really have any remorse about totally changing the layout up there.

Stay tuned...