Not only is it fun to have a house with a name, it's also fun to see it mentioned in various literature.
I stumbled across another reference to our house recently in Minnesota 1900: Art and Life on the Upper Mississippi, 1890-1915, by Michael Conforti.
It's good to see that the house is always cast in a positive light.
I hope we can do it justice.
Friday, November 4, 2011

Thursday, November 3, 2011
New Switches
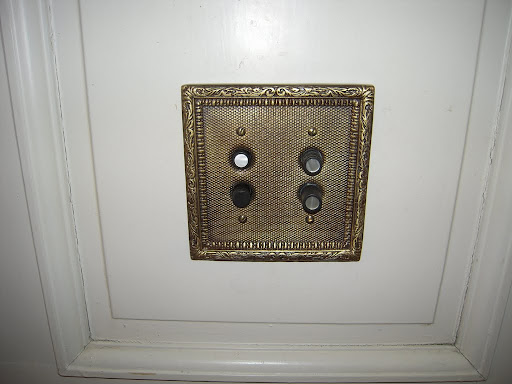
The latest packages arrived from House Of Antique Hardware and Kilian Hardware.
When we moved in, most of the switches were of the standard kind. One stood out however.
In the Music Room, there was an old push-button switch. It was very cool and had a nondescript brass cover-plate covered by many coats of paint.
We decided to go back to push-button switches in the "public" areas of the house. The twist is that we found more decorative cover-plates. We also found some dimmer switches that mimic the old push-button switches.
So in my spare time I've been installing these as well. They coordinate well with the antique sconces.
Wednesday, November 2, 2011
New Sconces

We've found some replacements at antique and salvage shops over the years and have finally finished enough re-wiring so that they can be controlled by switches in convenient spots.
The fun part about hunting for stuff is that you can find sets that work for an area, but don't have everything "match" all over the house.
While the electrician was here for the bathroom, he installed a few (bottom photo) in the main staircase and second floor landing.
These look much better.

Tuesday, November 1, 2011
New Dishwasher
We got a new dishwasher today. It would be nice if the story was that simple.
As usual, it's not.
The old one didn't really wash the dishes; it just got them wet. Not really a surprise.
A few weeks ago, we took advantage of a sale at Warner's Stellian and bought a dishwasher on sale. We paid the extra $100 to have them install it. That way I could concentrate on other projects.
Yeah right.
The delivery guy/installer showed up (on time!) and started to remove the old one. He noticed that the drain pipe for the sink was in an odd place.
As in, it didn't run down inside the wall to the basement. Rather it ran half inside the wall and half protruding out from the wall. Not a huge deal except that it then made a turn and ran away from the wall 8 inches and the top half of the pipe stuck up through the floor.
In the middle of the cavity for the dishwasher.
Newer dishwashers need the floor to be flat, not have some 8 inch length of 2" ABS pipe sticking up an inch out of the floor. Smack in the middle of the opening.
Oh yeah, and the surrounding cabinets were installed before the floor was tiled. So the opening is at least a half inch shorter that is normal.
So the thing had to be slammed like a low-rider.
Needless to say, it couldn't be installed as-is, so he gave up.
So I got to spend my Saturday re-routing the drain pipe to do it the right way. So much for working on other projects...
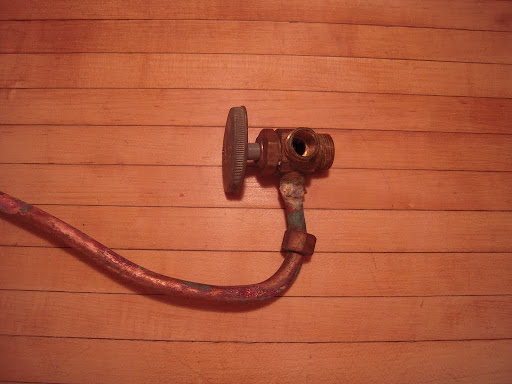
And while I was doing that, I found what's pictured.
Yup, this is the shut-off valve for the water line to the dishwasher and sink.
Note - I haven't touched the compression nut that (sort of) attached the the water line for the sink.
Really.
The compression nut is just hanging out doing nothing. It's the corrosion around the joint that held things together and kept it from leaking.
So I replaced the shut-off valve too.
And the guy came back to install the dishwasher today.
No problems. ;-)
The Attic Bathroom

This is the attic bathroom. It's the one I re-plumbed before we started remodeling the Kid's Bathroom. It's also the one we've been using during the remodel because it's the only one with a working shower.
Originally, this would have been the servants bathroom, so it's not fancy or big. But it does work. And since I ran new water lines, it has good water pressure and hot water!
Kid's Bath - Part 10
The bathroom is almost complete. Primarily what's left is some final painting!
Since the last post the initial coats of paint have been applied, vanity was installed, shower door was installed, and the finish electrical and plumbing have been completed.
Saturday, October 15, 2011
Sometimes you have to learn the Hard Way

Bill and his guys had drained the radiators so they could remove the one in the kid's bath. He stuck around for a few minutes yesterday to show me what I needed to know to bleed the radiators. So I splurged on the 99 cent radiator key and got to work.
A couple of the radiators in the attic went off without a hitch. Another couple did not. I could get the bleed valve open, but nothing would come out...
So I went to the second floor and started doing those. I finished all of them without any trouble.
Then I remembered that the back bedroom radiators are disconnected. And there are shutoff valves where the lines go up to the attic (see picture). It's obvious that's why nothing came out of the other attic radiators - the valves are closed!
What's not obvious is *why* the valves are there at all.
One might assume that they are to shut off the heat in the attic. After all the previous owner was living here alone and there would be no need to heat the attic.
And one would be wrong.
So I gently opened the valves and listened to make sure I was hearing all the right noises (or not!). I also checked for leaks around the joints and valves.
It was looking good. So I went to the basement to check the water pressure in the boiler and add more water. When everything was looking good there, I started back upstairs.
And as I passed by the basement workshop, I heard water dripping...
Not a little bit.
But like Niagara Falls.
So I sprinted up the stairs.
And Niagara Falls is flowing down the walls in the kitchen. I haven't messed with the radiators there yet, so I know this isn't the source.
So I sprint up the stairs to the back bedroom.
And Niagara Falls is flowing down the wall above the window in the picture.
So I sprint up the stairs to the attic and...
Nothing. No water. Anywhere.
So I run back down to the back bedroom and shut the valves. And Niagara Falls quickly subsides. Obviously there are holes or cracks in these radiator lines somewhere in the ceiling.
Everything cleaned up fine, but this was excitement I didn't need.
And now I know why this room looked like a disaster zone when we moved in. It's OK though, we'd planned to gut this room to the studs anyway. Now I have some entertainment to look for when we open the walls.
Kid's Bath - Part 9

We're getting closer...
All the tiling is finished. The marble cap on the shower curb went in and everything is grouted. It's amazing how much different it looks once its grouted.
All the mudding is done as well. Now we've got nice smooth walls.
All the wainscot is in, but only the first piece of the cap is installed. The other two pieces and the base shoe are next.
Wednesday, October 5, 2011
Kid's Bath - Part 8

We're getting close on the tile!
The inlay on the back wall of the shower is done, as is the nook on the side wall, and the bench with its Big Slab of Marble. I'll need that when I shave my legs...
And the floor got grouted today.
So, I think all that's left for tile work is to install the shower threshold and grout the shower.
Sunday, October 2, 2011
Kid's Bath - Part 7

By the end of the week, lots of things had happened.
In-floor radiant heat was installed
Sub-floor poured.
More tile was installed on the walls and floor of the shower.
And on Friday, all the floor tile was installed.
Subscribe to:
Posts (Atom)