I suppose at this point I shouldn't be calling this the old master bath. It should now probably be properly called Her Dressing Room...
The shade arrived recently and I quickly installed it. I'm sure the neighbors have been getting a thrill in the meantime.
Those with a keen eye will also note the new details on the panels in the left of the picture. We'd been toying with the idea for a while and...
You might recall that there was an article about us and the house in The Highland Villager just before the Ramsey Hill House tour back in September. The author had brought his wife along and we gave them both a tour as part of the interview. She is artist and one of her friends specializes in doing work like this, so naturally we got to talking and one thing led to another.
Last week she was here and did these cool little pieces.
Saturday, January 25, 2014
Wednesday, January 22, 2014
Got Mud?
Now it's going to get interesting...
All this is going to get spread around the walls and ceilings over the next couple of weeks.
I'm going to let the professionals have this one. They can do it much faster and better than I can. And I have other stuff I need to do.
All this is going to get spread around the walls and ceilings over the next couple of weeks.
I'm going to let the professionals have this one. They can do it much faster and better than I can. And I have other stuff I need to do.
Monday, January 20, 2014
Rockin' - Part 3
Despite the self-inflicted problem from the previous post, things have been progressing.
The bedroom is done. As is the hallway (except where it had to come down so I could re-wire).
All that's left is the interior of the two closets, interior of the bathroom, the ceiling in the big room, and the walls in the stair case.
Then mud and tape.
We have been thinking about various fixtures, flooring options, colors, etc and have already chosen some. So we're ready when the time comes.
The bedroom is done. As is the hallway (except where it had to come down so I could re-wire).
All that's left is the interior of the two closets, interior of the bathroom, the ceiling in the big room, and the walls in the stair case.
Then mud and tape.
We have been thinking about various fixtures, flooring options, colors, etc and have already chosen some. So we're ready when the time comes.
Two Steps Forward; One Step Back
This should have been a post showing a bit more progress, but...
Note the lack of drywall on parts of the ceiling and wall in the hallway. Their used to be drywall installed there, but it had come down.
After the drywall was hung in the hallway, I installed some temporary lights (see bare-bulb fixture hanging from the ceiling where there is drywall...).
And discovered that I messed up the wiring for the hallway fixtures controlled by the 3-way switches.
Arrrrgh.
That meant I needed to re-wire that leg of the circuit and therefore the drywall had to come down in a couple places. Better that I discovered it now rather than after it was all mudded, taped, and painted...
The reference book I've been using describes how to wire single fixtures controlled by 3-way switches. You can follow the same instructions when wiring multiple fixtures, EXCEPT when the fixtures are wired between the switches. I found a decent on-line reference for how to do it - note the difference between options 3 and 7. As an aside, I ended up re-wiring it like option 5...
Note the lack of drywall on parts of the ceiling and wall in the hallway. Their used to be drywall installed there, but it had come down.
After the drywall was hung in the hallway, I installed some temporary lights (see bare-bulb fixture hanging from the ceiling where there is drywall...).
And discovered that I messed up the wiring for the hallway fixtures controlled by the 3-way switches.
Arrrrgh.
That meant I needed to re-wire that leg of the circuit and therefore the drywall had to come down in a couple places. Better that I discovered it now rather than after it was all mudded, taped, and painted...
The reference book I've been using describes how to wire single fixtures controlled by 3-way switches. You can follow the same instructions when wiring multiple fixtures, EXCEPT when the fixtures are wired between the switches. I found a decent on-line reference for how to do it - note the difference between options 3 and 7. As an aside, I ended up re-wiring it like option 5...
Saturday, January 4, 2014
Rockin' - Part 1
We know this is going to take a while...
Thursday was prep day - get all the materials and tools up there.
Friday the installation started and made decent progress. The rock is about three-quarters of the way up to the ceiling on three walls of the big room.
Thursday was prep day - get all the materials and tools up there.
Friday the installation started and made decent progress. The rock is about three-quarters of the way up to the ceiling on three walls of the big room.
Here Comes the Boom
Early Thursday morning this showed up in front of the house.
170(!) 12-foot sheets went up through the attic window. Each sheet weighs 110 pounds, so that's by far the easiest way to get them up there... ;-)
Even though the heat in the attic isn't turned on yet, the new insulation has been keeping the attic temperature at 55 degrees. I think the guys were happy to be working in a relatively warm space for a change.
Sunday, December 22, 2013
It Wouldn't be a Party Without a Project
With this being the holiday season, I wasn't really working on any projects. We've had something going most every night, so there really wasn't time to devote to the house.
Thursday night we had some friends over (Hi Mark and Rhonda!) for a lovely evening. At that point everything was fine, but it wasn't to stay that way...
Yesterday (Saturday) was going to be a relatively lazy day so we could get ready for hosting a family gathering of 20-25 people on Sunday
Yeah, right...
Late in the morning my daughter came into the kitchen and said, "Dad, the bathroom floor is wet. Did someone plug the toilet?"
I went to check it out and indeed the floor was wet. But it wasn't from a plugged toilet. The tank had cracked and was slowly dripping onto the floor...
If you look closely at the picture you can see the crack. It runs from just above the flush lever down to the lower left corner of the tank. You can also see the discoloration in the base tile where the water's been drawn up into the tile. We'll have to see what happens to that when it dries out...
Needless to say, my lazy Saturday turned into a project day. I had to quickly do some on-line research to see what toilets were in stock locally, pick one up, and install it before we went to my mother-in-law's for the evening.
I managed to get it all installed and one of the guests got to "christen" it this morning...
Friday, November 29, 2013
Mind The Gap!
Weather-stripping isn't really meant to seal gaps more than an eighth-inch.
So the way to solve this problem is to shrink the gap.
In an ideal world, I'd move the jamb over where it's supposed to be. But that would mean filling a gap in the base molding next to the door.
Piecing in 3/8-inch chunks of a 4-part base molding is Not Feasible.
Fortunately, I found a big box store that carried flat trim that will work to fill the gap. It is the right width, can be cut to length, and is mostly the right thickness. It means the reveal from the jamb to the casing is off by a little bit, but that's something I can live with for "the servants' door". This stuff is only $.30 a foot. So $3 vs. close to $1K for a custom door; the math on that is left as an exercise for the reader... ;-)
The gap is a little narrower at the top, so once I cut it to length I scribed it and shaved it down to the right thickness everywhere. A plane, a sanding block, and a few minutes time is all it took. Then primed it on all sides and nailed it in place.
Oh, I forgot - I filled the old screw holes and cavities from the strike plates first. Then measured and chiseled out their new locations and...
Voila!
A door that stays closed. With a deadbolt that works.
And, even without *any* weatherstripping, seals better than it did before.
Later I'll caulk the joint, paint it, and install new spring bronze weather-stripping.
And those are projects for another day.
So the way to solve this problem is to shrink the gap.
In an ideal world, I'd move the jamb over where it's supposed to be. But that would mean filling a gap in the base molding next to the door.
Piecing in 3/8-inch chunks of a 4-part base molding is Not Feasible.
Fortunately, I found a big box store that carried flat trim that will work to fill the gap. It is the right width, can be cut to length, and is mostly the right thickness. It means the reveal from the jamb to the casing is off by a little bit, but that's something I can live with for "the servants' door". This stuff is only $.30 a foot. So $3 vs. close to $1K for a custom door; the math on that is left as an exercise for the reader... ;-)
The gap is a little narrower at the top, so once I cut it to length I scribed it and shaved it down to the right thickness everywhere. A plane, a sanding block, and a few minutes time is all it took. Then primed it on all sides and nailed it in place.
Oh, I forgot - I filled the old screw holes and cavities from the strike plates first. Then measured and chiseled out their new locations and...
Voila!
A door that stays closed. With a deadbolt that works.
And, even without *any* weatherstripping, seals better than it did before.
Later I'll caulk the joint, paint it, and install new spring bronze weather-stripping.
And those are projects for another day.
Wednesday, November 27, 2013
The Ill-Fitting Door
The door to the sleeping porch...
I guess I 'm at a loss for words (which is not something that happens often on this blog...). So I'll cover only the relevant bits here.
Note the giant gap between the edge of the door and the frame. It's almost a half-inch!
It is supposed to be only about an eighth-inch. This gap is wide enough that a decent breeze from the right direction will blow the door open. That's awesome in the winter time. Especially for our heating bill.
Another interesting thing is the existing weather-stripping. This spring bronze weather-stripping is great stuff. It seals well and lasts forever (unlike most modern stuff).
When it's installed correctly.
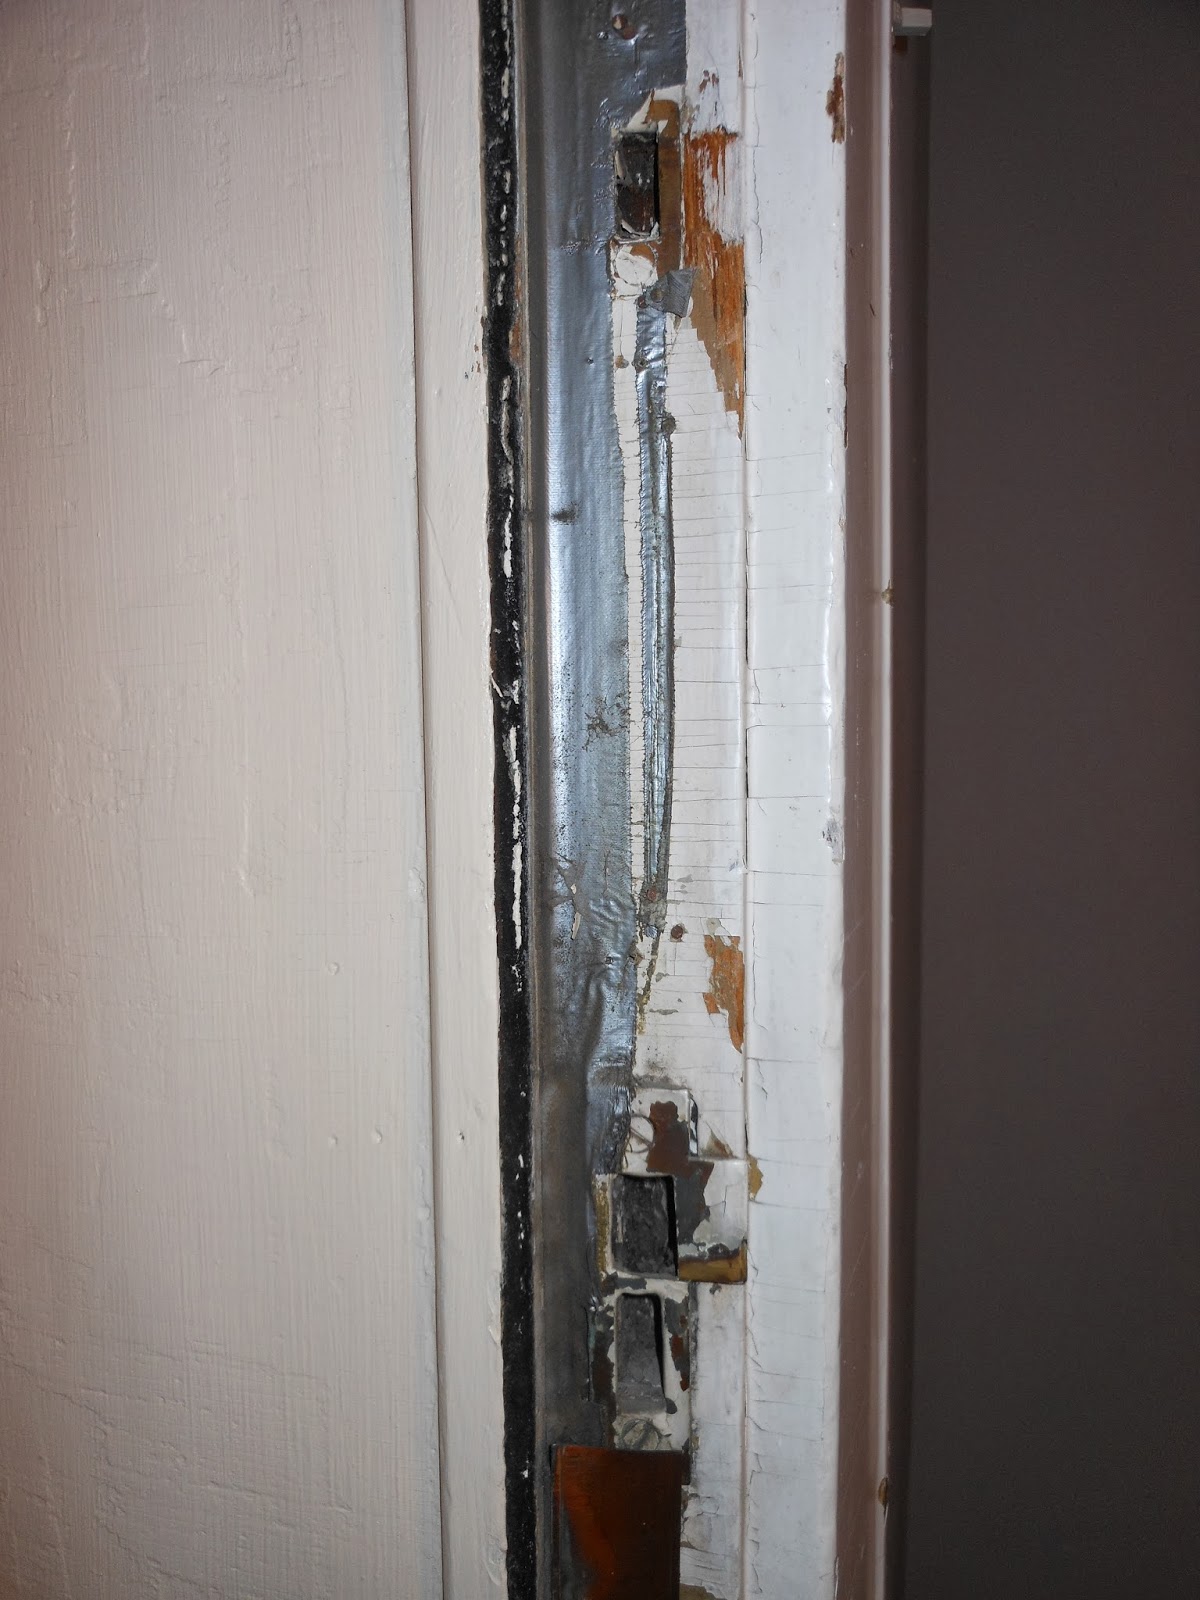
Note that the strike plate for the deadbolt is covered by the weather-stripping (see the spot on the jamb missing it's paint about eight inches above the strike plate for the doorknob). That means the deadbolt doesn't work because the bolt has nowhere to go...
Cooler still (no pun intended) is that the edge of the weather-stripping is up against the stop. That means is doesn't flex like it's supposed to.
As I took the old weather-stripping off so I could fix this, it got better. Behind the old weather stripping was a layer of duct tape.
I have no idea why.
One layer of duct tape isn't really enough to make any appreciable difference in sealing the half-inch gap around this door.
Oh yeah, what's this blob of electrical tape doing near the top of the jamb?
Yet another one of those things that makes you scratch your head in bemusement...
Of course, because none of this worked, several other things were added to the mix.
See that gray stuff just left of the strike plate. No, not the duct tape, the foam rod that is tucked behind the weather-stripping below the strike and is sort-of held in place by the duct tape above the strike.
Um yeah. That didn't work either.
So, I have an idea...
Lets add another piece of molding with a kerf so we can add a piece of felt weather-stripping as well (see black line just left of the gray foam rod).
Yeah.
And that didn't work either.
Surprising (or not!) considering that every type of weather-stripping known to man was installed on this door.
At. The. Same. Time.
I'll give them credit, at least they tried something new every time.
Still made the same mistake, though...
I guess I 'm at a loss for words (which is not something that happens often on this blog...). So I'll cover only the relevant bits here.
Note the giant gap between the edge of the door and the frame. It's almost a half-inch!
It is supposed to be only about an eighth-inch. This gap is wide enough that a decent breeze from the right direction will blow the door open. That's awesome in the winter time. Especially for our heating bill.
Another interesting thing is the existing weather-stripping. This spring bronze weather-stripping is great stuff. It seals well and lasts forever (unlike most modern stuff).
When it's installed correctly.
Note that the strike plate for the deadbolt is covered by the weather-stripping (see the spot on the jamb missing it's paint about eight inches above the strike plate for the doorknob). That means the deadbolt doesn't work because the bolt has nowhere to go...
Cooler still (no pun intended) is that the edge of the weather-stripping is up against the stop. That means is doesn't flex like it's supposed to.
As I took the old weather-stripping off so I could fix this, it got better. Behind the old weather stripping was a layer of duct tape.
I have no idea why.
One layer of duct tape isn't really enough to make any appreciable difference in sealing the half-inch gap around this door.
Oh yeah, what's this blob of electrical tape doing near the top of the jamb?
Yet another one of those things that makes you scratch your head in bemusement...
Of course, because none of this worked, several other things were added to the mix.
See that gray stuff just left of the strike plate. No, not the duct tape, the foam rod that is tucked behind the weather-stripping below the strike and is sort-of held in place by the duct tape above the strike.
Um yeah. That didn't work either.
So, I have an idea...
Lets add another piece of molding with a kerf so we can add a piece of felt weather-stripping as well (see black line just left of the gray foam rod).
Yeah.
And that didn't work either.
Surprising (or not!) considering that every type of weather-stripping known to man was installed on this door.
At. The. Same. Time.
I'll give them credit, at least they tried something new every time.
Still made the same mistake, though...
Saturday, November 16, 2013
Ducts!
Ducts! Everywhere ducts!
The guys have been working over the past two weeks to get the ducts and HVAC unit installed. They are nearly finished with the rough-in. The HVAC unit is in the mechanical room in the center of this picture. It's being installed with two zones.
One zone will heat and cool the attic. The other will cool the second floor directly (and the first floor indirectly - no duct-work needs to be installed down to the first floor). You can see the dual supply ducts running diagonally from upper-right to lower-left in the mechanical room and then off the left side of the photo.
The ducts run around the perimeter of the room behind the knee wall. The bottom duct supplies the second floor with each vent or return being in the 2nd floor ceiling; the top duct supplies this room. The window seats in each dormer cleverly provide a route for the duct-work.
Looks like only a day or two is left.
The guys have been working over the past two weeks to get the ducts and HVAC unit installed. They are nearly finished with the rough-in. The HVAC unit is in the mechanical room in the center of this picture. It's being installed with two zones.
One zone will heat and cool the attic. The other will cool the second floor directly (and the first floor indirectly - no duct-work needs to be installed down to the first floor). You can see the dual supply ducts running diagonally from upper-right to lower-left in the mechanical room and then off the left side of the photo.
The ducts run around the perimeter of the room behind the knee wall. The bottom duct supplies the second floor with each vent or return being in the 2nd floor ceiling; the top duct supplies this room. The window seats in each dormer cleverly provide a route for the duct-work.
Looks like only a day or two is left.
Subscribe to:
Posts (Atom)