Earlier today I finished laying the sub-floor in the shower. It's built up 3/4-inch above the floor in the rest of the room, but that's OK. The shower pan would have forced it to a different height anyway. At least we now have solid backing over the entire space.
I also pieced in sub-floor chunks in the rest of the room.
In addition, I made some minor mechanical adjustments - the HVAC duct openings needed to be extended out past the furring strips, the attic's electrical feeder cable needed to be stapled down, and the same for the AC drain tube.
I have a little electrical rough-in to clean up, but that will extend into the hallway (I want to get rid of some of the knob-and-tube in the hallway).
However, there's a big stack of drywall in the hallway that needs to be moved first. Might as well hang it if I'm going to move it...
Saturday, May 2, 2015
Tuesday, April 28, 2015
New Master Bath - Part 1
There's another deadline looming later in the year, so it's time to get back to work.
As part of the attic project, a lot of demolition was done in what was previously the butler's bedroom. The electrical and plumbing were roughed-in at the same time as the attic. That work involved cutting holes in the sub-floor.
The bulk of the framing got done, but the sub-floor never got patched. Hence the current task.
You'll note in this photo that there's not enough room for the sub-floor to clear the shower drain line (2x4 lying on edge on the far side of the drain).
So I'll be building up the floor a bit as well. Step one in this photo.
Sort of.
I had to adjust the drain first by hacking it off so I can raise it by the proper amount. It was either that or re-doing the whole length back to the vent (and probably further than that).
Obviously I still need another layer of sub-floor over this or there's no support for the shower pan over the drain line.
As part of the attic project, a lot of demolition was done in what was previously the butler's bedroom. The electrical and plumbing were roughed-in at the same time as the attic. That work involved cutting holes in the sub-floor.
The bulk of the framing got done, but the sub-floor never got patched. Hence the current task.
You'll note in this photo that there's not enough room for the sub-floor to clear the shower drain line (2x4 lying on edge on the far side of the drain).
So I'll be building up the floor a bit as well. Step one in this photo.
Sort of.
I had to adjust the drain first by hacking it off so I can raise it by the proper amount. It was either that or re-doing the whole length back to the vent (and probably further than that).
Obviously I still need another layer of sub-floor over this or there's no support for the shower pan over the drain line.
Tuesday, February 17, 2015
Sludge
In science class at my kids' school they have a project called "Sludge". Each student gets a jar full of unidentified material and the student performs various experiments to determine what components are in their mixture.
One of the sinks in the kids' bath has been draining slowly, so I took it apart today to see what the issue was.
It was sludge.
The tailpipe on the boys' sink was mostly clear. The one on the girls was lined with this.
I'm not sure what it is really. There's a little bit of hair in it, but it's mostly a thick layer of goop around the inside of the pipe.
Is it several years worth of makeup residue?
Sunday, February 15, 2015
It's Slowly Spreading
The horse theme has begun to spread from the study bath.
Here's the back story: There's an English hunting motif on the study bath's door, which led us to carry the theme into the bathroom. The walls have a faux antique leather finish and we found an English riding helmet, crop, and boots. We also found some artwork depicting old English fox hunts to tie everything together.
All this has been done for quite some time.
Fast forward to today where the two horses have been hung, one on either side of the window near the entrance to the study bath. The two pieces came from SWMBO's uncle who recently passed away.
Of course, there was artwork there already, but...
It wasn't meant to go there.
So they came down and have been moved to their originally intended location, the vestibule.
More nail holes to bug me...
On the other hand, that laser level I bought has come in handy when hanging these.
Here's the back story: There's an English hunting motif on the study bath's door, which led us to carry the theme into the bathroom. The walls have a faux antique leather finish and we found an English riding helmet, crop, and boots. We also found some artwork depicting old English fox hunts to tie everything together.
All this has been done for quite some time.
Fast forward to today where the two horses have been hung, one on either side of the window near the entrance to the study bath. The two pieces came from SWMBO's uncle who recently passed away.
Of course, there was artwork there already, but...
It wasn't meant to go there.
So they came down and have been moved to their originally intended location, the vestibule.
More nail holes to bug me...
On the other hand, that laser level I bought has come in handy when hanging these.
Saturday, February 14, 2015
Bubbles
One of the errands while we were running around today was picking these up. We'd picked fabric through a decorator we've been using and they finally came in. They replace the chairs that were photo-bombing in a recent post.
The pattern isn't quite as wild in person as it appears in the photo. The fabric really picks up the colors in the room & the other accessories and helps unify things a bit more.
As always, there was concern about getting things up the attic staircase because it is quite narrow and has a couple of 90-degree turns. The chairs *just* fit through the doorway at the bottom of the stairs.
The pattern isn't quite as wild in person as it appears in the photo. The fabric really picks up the colors in the room & the other accessories and helps unify things a bit more.
As always, there was concern about getting things up the attic staircase because it is quite narrow and has a couple of 90-degree turns. The chairs *just* fit through the doorway at the bottom of the stairs.
Sunday, February 8, 2015
The Silver Cup
Here are more examples of why some people refer to Saint Paul as "Saint Small".
Long-time readers of this blog will remember the very first post, in which I shared a little information about the first two owners. The silver cup in this picture is on display at Town & Country Club. It was won by none other than the second owner of our house, P. Dean Gribben. At some point it would be interesting to talk with the club historian to learn more about this cup, as well as why it is on display.
And another interesting coincidence, the original Town & Country Club was designed by the same architect as our house; Cass Gilbert.
Long-time readers of this blog will remember the very first post, in which I shared a little information about the first two owners. The silver cup in this picture is on display at Town & Country Club. It was won by none other than the second owner of our house, P. Dean Gribben. At some point it would be interesting to talk with the club historian to learn more about this cup, as well as why it is on display.
And another interesting coincidence, the original Town & Country Club was designed by the same architect as our house; Cass Gilbert.
Monday, January 19, 2015
Wait Until It's Done
SWMBO complains that I post pictures before everything is done.
If I waited until it was done, I wouldn't get to post any pictures at all. There's still something to do in every room we've "done"...
Yesterday, for example, we finally acquired and hung the last picture in this grouping. They are wedding photographs of us, our parents, and grandparents. We've been trying to acquire a copy of the photo of the last set of grandparents for quite some time and it finally arrived. It would be cool if we could get wedding photos of the great-grandparents, but I'm not sure that photos ever existed.
And SWMBO is probably going to be cheesed that I took this picture before all the knick-knacks were put back after un-decorating for the holidays.
You can't win...
More bits have also been trickling in for the attic. In the big room, the window treatments are in, as are the window seat cushions and some of the pillows. The brown chair photo-bombing the lower left corner of the picture is temporary. The real ones will be in soon, supposedly.
For reference, this is one of the attic dormers at the front of the house.
The hipped roof detail that is reflected on the inside of the house is a unique touch that turned out really well.
If I waited until it was done, I wouldn't get to post any pictures at all. There's still something to do in every room we've "done"...
Yesterday, for example, we finally acquired and hung the last picture in this grouping. They are wedding photographs of us, our parents, and grandparents. We've been trying to acquire a copy of the photo of the last set of grandparents for quite some time and it finally arrived. It would be cool if we could get wedding photos of the great-grandparents, but I'm not sure that photos ever existed.
And SWMBO is probably going to be cheesed that I took this picture before all the knick-knacks were put back after un-decorating for the holidays.
You can't win...
More bits have also been trickling in for the attic. In the big room, the window treatments are in, as are the window seat cushions and some of the pillows. The brown chair photo-bombing the lower left corner of the picture is temporary. The real ones will be in soon, supposedly.
For reference, this is one of the attic dormers at the front of the house.
The hipped roof detail that is reflected on the inside of the house is a unique touch that turned out really well.
Saturday, November 29, 2014
The Doorbell
Sometime during the attic demolition the front doorbell quit working. Fixing it was low on my priority list, obviously (it's been at least a year since it last worked...).
So that's my excuse if you stopped by and we didn't answer the door. It was nothing personal. ;-)
My lack of motivation to fix it can also be attributed to the mess of wires in the picture. I just wasn't looking forward to figuring out which ones were for the doorbell. They all seemed to be connected to the bell's transformer in one way or another.
And other wires were too.
I think over time there were a number of "clever" people who connected various things together to make noise with as little wire as possible.
Doorbells. Phones. Switches/buttons in various rooms to summon "The Help".
Splices everywhere.
Partially visible wires that eventually disappear into a wall or ceiling.
3 hours of tracing wire just to get back to where I started the day: with the back doorbell working after I removed as much wire as I thought prudent.
Then 2 more hours tracing the front doorbell wiring, trying to determine where all the splices are going.
Finally I just gave up and cut the splices. Wherever they were going wasn't working anyway...
But the front doorbell is working again.
So that's my excuse if you stopped by and we didn't answer the door. It was nothing personal. ;-)
My lack of motivation to fix it can also be attributed to the mess of wires in the picture. I just wasn't looking forward to figuring out which ones were for the doorbell. They all seemed to be connected to the bell's transformer in one way or another.
And other wires were too.
I think over time there were a number of "clever" people who connected various things together to make noise with as little wire as possible.
Doorbells. Phones. Switches/buttons in various rooms to summon "The Help".
Splices everywhere.
Partially visible wires that eventually disappear into a wall or ceiling.
3 hours of tracing wire just to get back to where I started the day: with the back doorbell working after I removed as much wire as I thought prudent.
Then 2 more hours tracing the front doorbell wiring, trying to determine where all the splices are going.
Finally I just gave up and cut the splices. Wherever they were going wasn't working anyway...
But the front doorbell is working again.
Friday, November 14, 2014
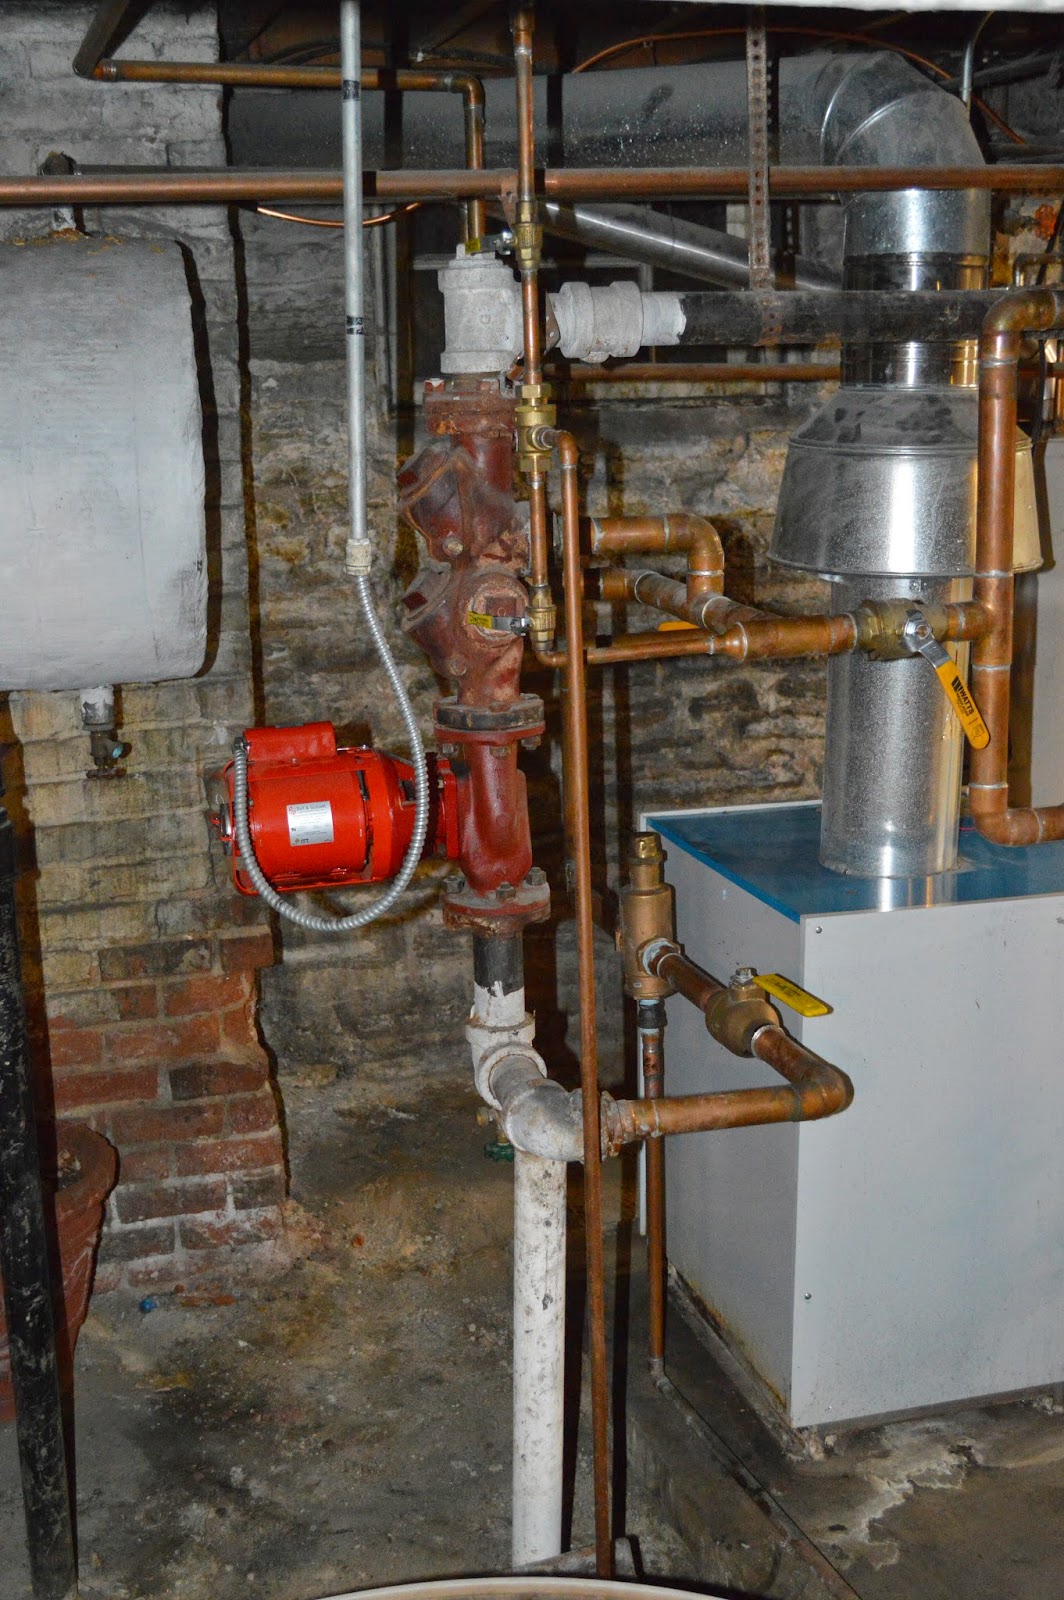
All Boilers Leak
At least that's what the dude said when he came to look at the leak.
Note the water stains around the boiler pad. Compare with the picture in this post. Note the lack of water stains and that none of this has ever leaked as long as we've been in the house.
I'd gone down to check the pressure in to the system before burping the radiators for the winter and noticed some dripping around the air-valve to the right of the pump (in the old picture). I also noticed that the pressure gauge read zero. Interesting since I'd never seen that before; it always had at least 5 or 10 pounds in it.
So of course I started to fill it.
The more water I added, the faster the drip became.
Hence the call to the boiler company.
And the dud(e) shows up.
"They all leak," he says. "And it's leaking because there's no pressure."
No dude. There's no pressure because the darn thing is leaking!
So after he added a thousand gallons of water, the gauge still read zero, and there was a bigger puddle on the floor, there was a call to the boiler company to send someone who had a clue.
And he arrived the next day. Which is why there's now a new, working pressure gauge. And a working air-valve that's properly located. And a new spiral valve where the old air-valve was. And an extra shutoff valve that isolates the boiler so we don't have to drain the entire system next time.
And that first guy is not coming anywhere near this house again...
Note the water stains around the boiler pad. Compare with the picture in this post. Note the lack of water stains and that none of this has ever leaked as long as we've been in the house.
I'd gone down to check the pressure in to the system before burping the radiators for the winter and noticed some dripping around the air-valve to the right of the pump (in the old picture). I also noticed that the pressure gauge read zero. Interesting since I'd never seen that before; it always had at least 5 or 10 pounds in it.
So of course I started to fill it.
The more water I added, the faster the drip became.
Hence the call to the boiler company.
And the dud(e) shows up.
"They all leak," he says. "And it's leaking because there's no pressure."
No dude. There's no pressure because the darn thing is leaking!
So after he added a thousand gallons of water, the gauge still read zero, and there was a bigger puddle on the floor, there was a call to the boiler company to send someone who had a clue.
And he arrived the next day. Which is why there's now a new, working pressure gauge. And a working air-valve that's properly located. And a new spiral valve where the old air-valve was. And an extra shutoff valve that isolates the boiler so we don't have to drain the entire system next time.
And that first guy is not coming anywhere near this house again...
Saturday, November 8, 2014
The Fence
When we got the landscaping plan, the designer thought we should put a fence along the driveway. It was low on our priority list; we wanted to do a number of other things in the yard first.
Well, this was the first year we really didn't do anything in the yard; the bulk of the landscaping plan has already been executed. I've already dug enough holes to last a lifetime...
These arborvitae looked pretty good when we moved in, but the rabbits have really taken the bottom few feet apart over the past couple of winters. So it seemed like this fall would be a good time to finally pull the trigger on the fence.
Here's another "before" view from halfway down the driveway.
And a final one from the end of the driveway to give perspective.
I was busy with other things, both work and house projects, so we got bids from several fence companies. It also took a while to get things hammered out with the Historic Preservation Commission. Eventually everyone was happy with the design.
It didn't take them long once they got started. One crew did the layout, dug the holes, and set the posts in a day.
A different crew then built the fence over the next two days. The bottom, "solid" part of the fence is roughly 4-feet high.
The lattice at the top is 16-inches high or so. So the fence as a whole is not overly tall. The post caps add a little decorative touch.
Here's a shot from halfway down the driveway. The lattice-work stops part-way down the fence line.
And the final shot from the end of the driveway. The fence ends behind the front facades of both our house and the neighbors. It's what we'd planned anyway, but is also required by the HPC.
It turned out really well.
I just wish it would still smell like this a year from now...
And Part 2 of Big Trees:
All the leaves are finally off the trees this fall. We spent a day last weekend raking the lawn for the second and last time. Today I finished all the flower and perennial beds. We ended up taking about 30 60-gallon bags of shredded leaves to the county compost site. The last couple are visible on the lower right of the last picture.
A few years ago when I was travelling on business, SWMBO raked the leaves with the kids. They didn't know how to use the shredder and ended up with 90 bags.
That's right, 90 bags.
Well, this was the first year we really didn't do anything in the yard; the bulk of the landscaping plan has already been executed. I've already dug enough holes to last a lifetime...
These arborvitae looked pretty good when we moved in, but the rabbits have really taken the bottom few feet apart over the past couple of winters. So it seemed like this fall would be a good time to finally pull the trigger on the fence.
Here's another "before" view from halfway down the driveway.
I was busy with other things, both work and house projects, so we got bids from several fence companies. It also took a while to get things hammered out with the Historic Preservation Commission. Eventually everyone was happy with the design.
It didn't take them long once they got started. One crew did the layout, dug the holes, and set the posts in a day.
A different crew then built the fence over the next two days. The bottom, "solid" part of the fence is roughly 4-feet high.
The lattice at the top is 16-inches high or so. So the fence as a whole is not overly tall. The post caps add a little decorative touch.
Here's a shot from halfway down the driveway. The lattice-work stops part-way down the fence line.
And the final shot from the end of the driveway. The fence ends behind the front facades of both our house and the neighbors. It's what we'd planned anyway, but is also required by the HPC.
It turned out really well.
I just wish it would still smell like this a year from now...
And Part 2 of Big Trees:
All the leaves are finally off the trees this fall. We spent a day last weekend raking the lawn for the second and last time. Today I finished all the flower and perennial beds. We ended up taking about 30 60-gallon bags of shredded leaves to the county compost site. The last couple are visible on the lower right of the last picture.
A few years ago when I was travelling on business, SWMBO raked the leaves with the kids. They didn't know how to use the shredder and ended up with 90 bags.
That's right, 90 bags.
Subscribe to:
Posts (Atom)