Wednesday, November 6, 2019

Bleeding Radiators

Back in April, we had the tile replaced in the front entry.

As part of the work, the radiator needed to be removed. Which meant that the system need to be drained first.

When ever the system gets drained, the air needs to be bled out of it before it will work properly.

Ours is a hot water system and the water won't circulate properly if there is any air in it.

Air is lighter than water (duh!) so the high spots are where the air collects. In each of these high spots you need an air bleed valve so you can let the air out of the system.
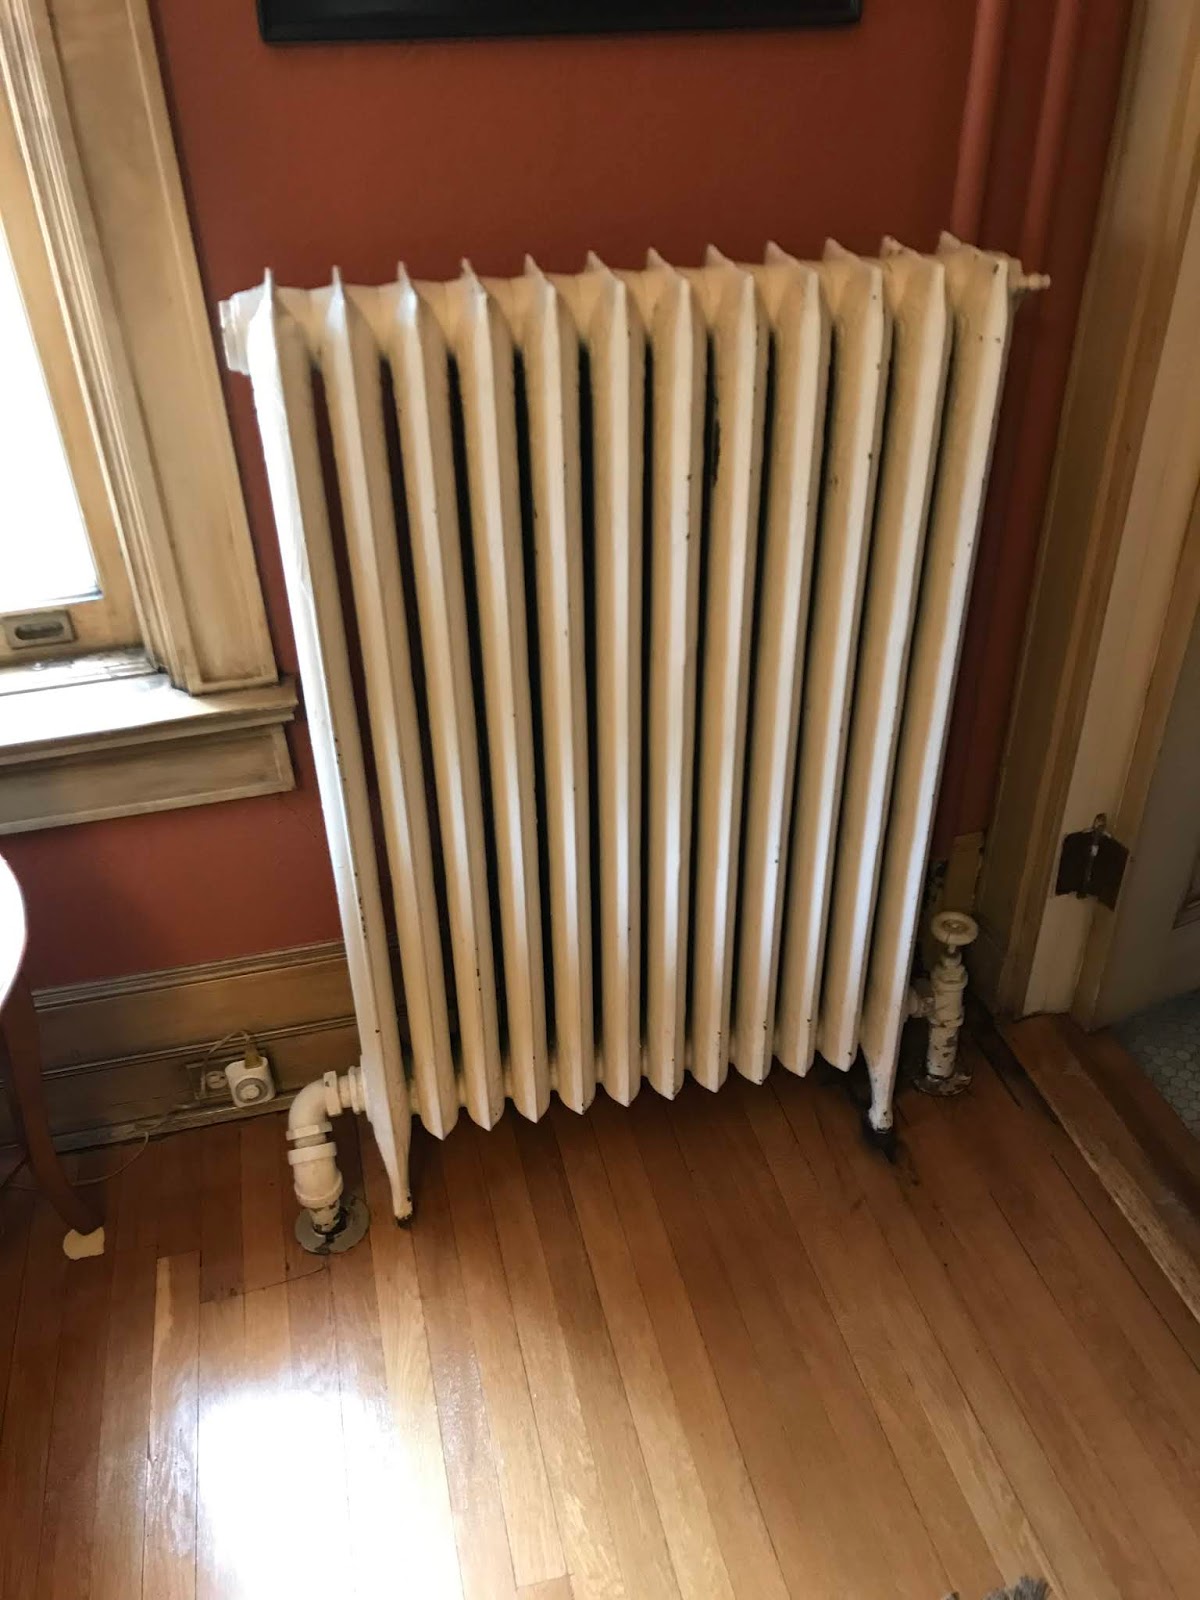
Therefore, each radiator has a bleed valve.

Here is one of our 18 radiators. Hot water comes into the radiator in the pipe at the lower right. It flows through the radiator and leaves to go back to the heat source through the pipe at the lower left. Each of the "fins" is hollow and made from cast iron. When operating properly it is filled with hot water that radiates heat into the room. When there is air in the radiator, water doesn't flow through it and it doesn't heat the room. The bleed valve protrudes from the top right of the radiator.

The bleed process is quite simple (example videos at the end of the post). You need a couple of items: a valve key to open/close the valve and a cup to catch the water.

  1. Position the cup to catch any water
  2. Open the valve with the key
  3. Wait for the air to escape and water to come out the valve
  4. Close the valve with the key
You need to do this process with each radiator and manifold, along with any other bleed valves you might have. Start with the ones that are highest and farthest from the heat source, working your way back down and toward the boiler.

You'll also need to manage the water and water pressure in the system while you're doing this. If the system has a lot of air, you'll eventually lose pressure to push the air out while bleeding. Make sure you don't add too much water, though. As the water heats up, the pressure rises (remember your high school physics...) and you don't want to trip your pressure relief valve or you'll be starting all over again

If you later hear water gurgling in a radiator, you need to bleed again. The gurgling indicates there is air in the system. You might also need to do this a couple of times over the course of a week or so to get all the air out.

Now for the videos. This one didn't have much air. It has a good view of the exit port.


This one had a bit more air, but still not too bad. It can sometimes take quite a while... A poorer view of the port, but you can better hear the transition from air to water.


Friday, September 20, 2019

The Front Porch - Day 3

More progress today. The whole thing is now covered in metal with integral gutters on each side.

The Front Porch - Day 2

The work is going quickly. Thursday all the framing was repaired and new decking installed.

And new roofing paper applied over that.

Stay tuned for Friday's progress...

Thursday, September 19, 2019

The Wait Is Over

Yesterday the dog started barking about something. He is good about letting us know when something new is happening. Once he is confident we are aware of what's going on, he stops.

This time it was because the roofer was here and starting to get things done.

The area over the front door is a flat roof with a rubber membrane. Or I should say *had* a rubber membrane.

Four layers of roofing were removed. Some of the framing is bad due to previous water damage and needs to be replaced. Other joists just need sistering.

Then new decking, gutters, and roofing material.

Then the columns and other millwork can get repaired/replaced. And finally painted.

Sunday, September 15, 2019

The Waiting is the Hardest Part

Over time we'd noticed issues around the front facade which is why we had the front tuck-pointed last year. This year the plan was to get the mill-work repaired and repainted. Along the way we determined the flat roof needed to be redone as well.

There was some initial discussion about getting it done for Little Man's graduation party in June, but that didn't really work out. It was going to be too hard to get it squeezed into the short time frame.

I've lost track of time of when exactly this was, but I arrived home from work one night a while back and our contractor was on the boulevard explaining to the sub the various bits of carpentry that need to be fabricated. Fluted columns, moldings, and turned bits. Things were starting to line up.

I made a mental note that I should start on the cellar doors and wondered if I would have them done (or not!) before the front work was done. At the time, I thought it would be close. So I got started on the cellar doors.

And finished them.

Then a couple of weeks ago the scaffolding showed up for the front.

And the painting started. The prep, the priming, and the painting of the front proceeded pretty well.

As they were finishing up, we mentioned some other spots around the house that needed love. It's been ten years since the sides and back were painted, so needing a little touching up is normal. They jumped right on it and had all of it done pretty quickly.

Were still waiting on the roofer and the various carpentry, though.

The painters will have to come back to finish up after that.

Sunday, August 4, 2019

Cellar Doors

In several previous posts I mentioned that the cellar doors needed to be rebuilt.

It's pretty obvious that though they served us well over the past 10 years or so, it's time for them to be replaced.

We looked at commercially available doors, but no one makes them this big. We also talked with our contractor who suggested fabricating wooden doors and then wrapping them with sheet metal so they'd last "forever". That option was more expensive than I thought prudent, so we went for the DIY option.

They are in shade a good portion of the day, so don't always dry out quickly.

We were also a little slow getting them painted, which I'm sure didn't help.


I've spent the past couple of weeks building the new ones a little at a time each night and using the old ones as a pattern.

The underlying framing structure was fine, so it didn't need to be replaced. Only the exposed facing needed help. Mostly it is 1x6 tongue & groove with the smooth side exposed. There's a 1x2 that caps the right edge and a 1x8 that wraps the right side.

This time I put at least one coat of solid stain on all six faces of each piece before assembly. I also followed up with a second coat over everything. That should help with their longevity.

In addition, I built them from cedar, which is a better wood for exposed conditions.

We also picked a different color this time. Rather than a color that contrasts with the brick, we picked one that coordinates with it. The stain was a recommendation from our friends at Abbott Paint. I have some left over, so will be able to re-coat when necessary.

These should last at least 10 years.

Plumbing Repairs

Sometimes there are coincidences.

A few weeks ago my parents called. They asked if I would come over to help install a new cartridge in their kitchen sink faucet. Theirs had been leaking and they had ordered the replacement part. We made plans for me to come over once the part arrived.

Coincidentally, our kitchen faucet had also started leaking. I went through the diagnosis and we had the same problem. The cartridge is a lifetime warranty item, so we had the manufacturer send a new one.

So, a few days apart, I got to play plumber and replace both.

My parents' is working fine, but ours is still dripping a little, so I'll need to play with it a bit more.

Saturday, August 3, 2019

Other Party Preparation

Apologies for the long gap between updates. It has been a busy summer. Also apologies for the poor quality photos. They were taken from the second floor window and I didn't take time to remove the screen.

In the previous post I showed some of the party decorations. Here are some of the others.

With Little Man being a football player, the party had a football tailgating theme.

The party planner suggested turning the yard into a football field. That was enough to get me started.

A few minutes of thought, a little calculation to get the scale, and I had the plan. Having worked for the city as summer help as a teenager cutting grass and lining ball fields, I knew just what to do to execute the plan.

Spray paint, six stakes, some string, a tape measure, and a little simple math (remember the Pythagorean Theorem aka the 3-4-5 rule?). The tape measure and 3-4-5 rule makes it easy to get 90 degree corners.

I used the same spray paint that the utility companies use to mark their lines before you dig. It's available in many colors at your local big box store. I free-hand painted the yardage numbers and the high school mascot in the appropriate color in this end zone.

And the college mascot name in the other end zone.

If I hadn't miscalculated on paint, this would have taken only an hour or so. Alas, I needed to run to the orange box to get another can of white.

Sunday, June 9, 2019

Customer Service

While this blog is about the house, sometimes it leads to tangential educational opportunities.

I was doing various projects to prepare for the party. Some were directly related to the house and yard, while others were really just for the party.

For an example of the latter, I needed a dozen long stakes or poles that I could use to string some decorations around the edge of the yard. After some searching online, we found 6-foot wooden garden stakes which would fit the bill.

My plan was to cut a small slot in the end of the stake into which I could slide the end of the string from which the decorations were hung. I'm not really giving anything away by showing the end product - some appropriate colored pennants which I cut from foam sheets from a local craft store and the paper football lanterns. Obviously this used only three stakes, so there were three other arrangements like this placed strategically around the yard.

I say the plan "was". Actually, the plan became reality. The story, however is in the acquisition of the stakes.

As I said, I found them online and in stock in a local store. At least according to their website and mobile app.

They have a store that is conveniently on my way home from work, so one evening I made a stop.

I'd noticed in the mobile app that they generally have the item's store location listed. For example in "Aisle 52, Bay 5". In this case, no location was listed. I assumed that was because these would likely be in the garden center because these are seasonal items.

When I arrived at the store, I went to the garden center and started looking around. It didn't take long for me to find the end-cap that contained the garden stakes.

But only fiberglass and metal stakes were present. The wooden ones I was looking for were nowhere to be found.  As I looked around across the garden center, I saw a young man in an orange apron watering plants and a cluster of people nearby that looked deep in conversation about the store. I assumed they were management.

A walked over and as I got close, the older man in the group faced me and asked, "Do you need some assistance?"

"Yes," I replied.

Without saying a word he waved his hand dismissively at the young man watering the plants, who then dropped his watering wand. The young man asked, "How can I help?"

"I'm looking for these 6-foot wooden garden stakes that your app says are in stock in the store. I don't see them in this display with the other stakes," I replied. I showed him the app on the page for the stakes.

He pulled out his mobile device and looked up the SKU. He stared at the screen wordlessly for a bit before saying, "Let me give someone a call."

He dialed a number and stood there wordlessly for a few minutes before hanging up.

He turned back to me and said, "There's no location because they just got delivered today and they are still in the trailer out back. We don't unload the trailer until after 8pm so you'll have to come back then."

I said thanks and walked away.

So here's the customer service lesson:

WHEN YOU HAVE A CUSTOMER IN THE STORE WANTING TO BUY SOMETHING AND IT'S IN THE BACK, GO GET IT FOR THEM. DO NOT TELL THEM TO COME BACK LATER. BECAUSE THEY WON'T.

I got in my car and drove 10 minutes to Gertens, who had them in stock and I bought them on the spot.

Saturday, June 1, 2019

Plants

I mentioned in an earlier post that we'd done a bunch of planting.

This is by far the biggest of the annual beds. It contains about 175 annuals this year. It's in deep shade almost the entire day, so contains the usual suspects: Impatiens and Coleus. There's a third plant type in there, but I don't recall what it is. Because it's an annual I'm not going to waste a brain cell remembering it.

We have 6 other annual beds scattered around the yard that have various plants appropriate for the the amount of sun in that area.

As usual we lost a few shrubs over the winter, so they had to be replaced.

These two are "Orchid Lights" Azalea. They have a light pink bloom in the spring and maintain a compact form. As they mature they will visually soften the edge of the cellar doors. They replace some arborvitae that suffered windburn in the winter wind tunnel that is our driveway. We've tried several aborvitae varieties here, but none have made it more than a couple years.

These three are "Java Red" Weigelia. It has dark red buds which open into deep pink blooms in late spring/early summer, a compact mounded form, and bronze foliage which complements the brick while contrasting with other plants in the vicinity. Like the Azalea, they replace some arborvitae that just weren't thriving in the driveway wind tunnel.

Switching to the north side of the house, we have several new Yews that finish the foundation plantings: "Emerald Spreader" and "Nova".  There were already 5 spreading yews that follow the curved wall on the left edge of the photo. "Emerald Spreader" is a low spreading yew that continues the line of similar yews to its left. "Nova" is the upright yew to the right that provides a visual anchor at the corner. Both should thrive in the deep shade that is the north side of the house. There are a matching pair at the left end of this bed to provide the necessary symmetry. It is a Georgian Colonial after all...

Next we move to the wall at the northern border of the kingdom. These five Dwarf Burning Bush replace the previous five that were in the same location. Even though we're south of the wall, the wildlings took their toll over the long winter. It wasn't so much the winter as the rabbits that girdled the previous plants.  Perhaps the new Guardian of the Garden (aka The King of Mulch Mountain) will do a better job of keeping the wildlings at bay...

Further west along the wall we have six "Iroquois Beauty" Black Chokeberry. They have white flowers in the spring, long-lasting berries in the summer, and a dark wine-red fall color. They help camouflage the wall and will provide a good understory for the new apple trees as they mature. The other three are positioned similarly at the other end of this bed. (Note the stump from the old apple tree which is already well into the process of decomposing.)

This isn't a new plant but is one that looks fantastic at the moment, especially from across the yard. In the left foreground is a bleeding heart which is still in bloom and on the right is an Azalea in full bloom; it's one of the "Northern Lights" series, but I don't remember which one. From the patio the two blend together and there is a striking mass of color. There is a similar pairing to the right of the peach tree.

Lastly, the "Susan" Magnolia in the northwest corner. It has a compact form, reaching perhaps 8-10 feet at maturity, and thick dark leaves that contrast with other adjacent foliage. It has reddish-purple flowers in late spring and tends to avoid frost damage, which is what did in its predecessor. "Susan" is the last chance for a Magnolia in this spot...