Since the last post there hasn't been a lot of big progress. Because we have another event we're hosting soon, I don't want to get anything big started quite yet. A few things have moved forward, though.
The insulation in the attic has received it's "ignition barrier". Most of the insulation will be covered by sheetrock which serves that purpose. However, the parts behind the attic knee-wall won't be directly covered by sheetrock. The alternative was an intumescent coating (a special thick paint) that serves that purpose instead. So the attic has now passed its insulation inspection.
Next up is the HVAC rough-in. As it turns out, we have a gas meter that's undersized considering all the gas appliances we have, let alone that we're adding another gas furnace for the attic. So Excel is coming to upgrade the service first. Then the new gas line can be run to the attic and the ductwork installed. We'll be without heat until the gas line is done, so I'm glad I have those flannel jammies with the integrated feet... ;-)
In the mean-time I've also been cleaning up various things: removing more knob and tube wiring in the basement, burping the radiators, locating & installing various interior door strike plates, and fixing the ill-fitting door to the sleeping porch.
Monday, October 28, 2013
Sunday, October 6, 2013
Repairing Rotten Wood
At the house tour several people asked how to repair rotten wood - sashes, storms, window sills, etc.
My opinion is that I want to save as much of the old wood as possible. The wood in this house is old slow-growth wood with tight grain. They don't grow wood like this any more. The modern way is to use fast-growing varieties that can be quickly harvested, etc. That means the grain is more open and it doesn't last as long when exposed to the elements.
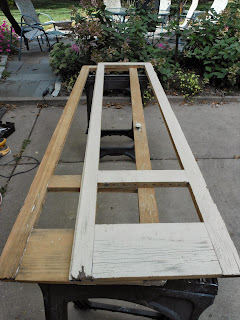 I'll use these screens as an example. Note the rotted wood at the bottom of each stile. The ones on the left side of photo are worse than the right. I assume that the rails are fine because the end-grain isn't exposed. (For those who aren't familiar with window parts, the rails are the vertical pieces that run along the side of the opening while the rails are the ones that run horizontally along the top and bottom. Each of these screens has two stiles and three rails.)
The first step was removing all the old paint to get down to bare wood. The bottom screen is already paint-free. Then you can see what condition the wood is in and determine what needs to be removed and what can be saved. Most of this wood wasn't too bad, so I didn't have to remove a lot.
 The next step was stabilizing the remaining wood at the bottom of each rail. A few people, including the guys at my favorite store, recommended a two-part epoxy by Abitron (two bottles on the left of the photo). All you do is mix equal parts of the two liquids together and brush it on the wood, letting it soak in. As it hardens it results in a nice stable base for the next step of replacing the removed material.
For that I used a two-part wood filler product (see the two tubs on the right of the photo). Each of the two parts has the consistency of lightweight Play-Doh. Simply knead equal parts of each in glove covered hands until thoroughly mixed and apply and shape as desired.
 Once it has hardened, it's easy to shape and sand. I also used it to fill the rim-lock hole in a door, so it works well in places where you're filling holes too large for other types of filler. And here's the finished product, ready to be installed next spring. In this photo, the screens are oriented the same direction as previously, they've just switched which is on top. Note that the left stiles' ends are now level with the edges of the rails, even though another half-inch or so was removed from the ends compared to the first photo.
As an aside, the new triple-bead screen molding was "back-primed" before installation. Making sure it has paint on all sides helps it last longer...
My opinion is that I want to save as much of the old wood as possible. The wood in this house is old slow-growth wood with tight grain. They don't grow wood like this any more. The modern way is to use fast-growing varieties that can be quickly harvested, etc. That means the grain is more open and it doesn't last as long when exposed to the elements.

The first step was removing all the old paint to get down to bare wood. The bottom screen is already paint-free. Then you can see what condition the wood is in and determine what needs to be removed and what can be saved. Most of this wood wasn't too bad, so I didn't have to remove a lot.

For that I used a two-part wood filler product (see the two tubs on the right of the photo). Each of the two parts has the consistency of lightweight Play-Doh. Simply knead equal parts of each in glove covered hands until thoroughly mixed and apply and shape as desired.

As an aside, the new triple-bead screen molding was "back-primed" before installation. Making sure it has paint on all sides helps it last longer...
Subscribe to:
Comments (Atom)