Sunday, December 27, 2015

The Master Bath Doors

In the beginning...

When we were planning the attic and master bath work, we intended to re-use as many original doors as possible. At the time, the doors in the attic were different than the doors in the rest of the house.  That's not a surprise because the attic was meant as servant quarters and the attic doors were of lower quality

All of the new doors in the attic were re-purposed from elsewhere in the house.  Some we found in the basement or attic; others I had removed during previous work; still more came from the demolition of the butler's bedroom (what is now the master bath).

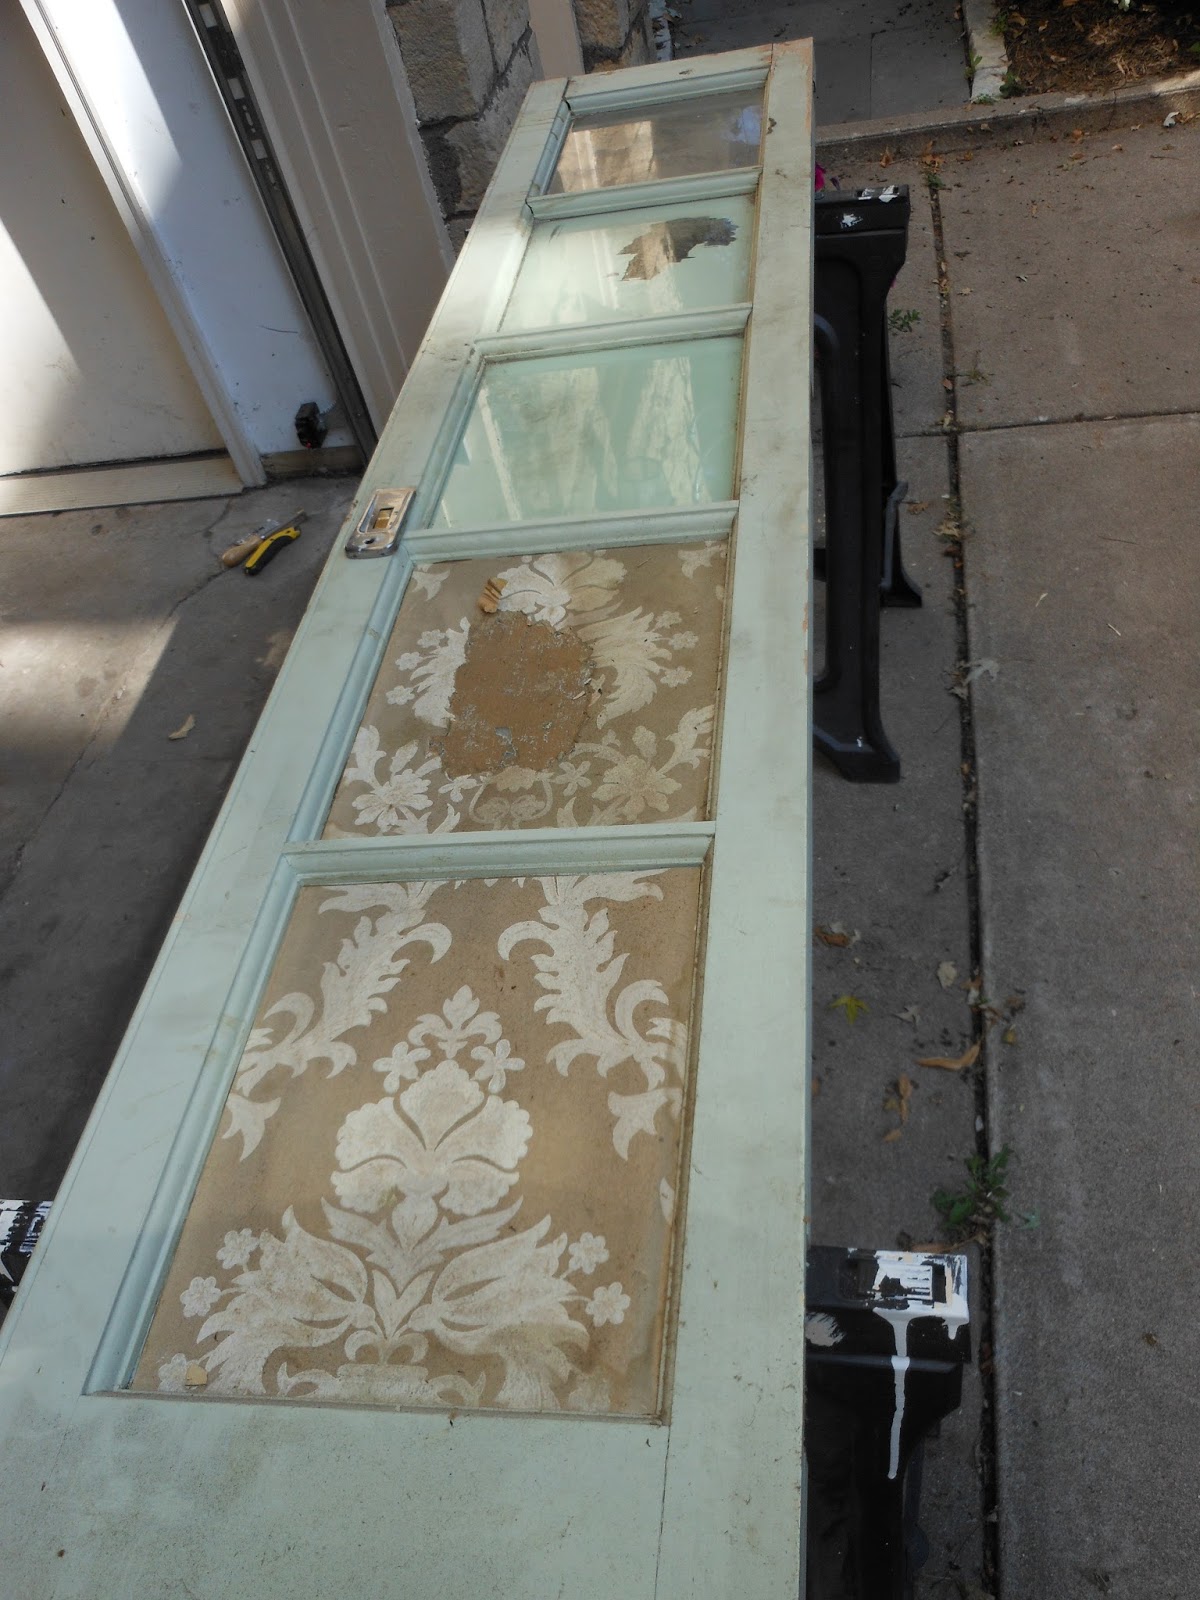
As part of the treasure hunt, we found a pair of French doors in a pile of stuff in the attic and decided to use them as the doors between SWMBO's dressing room and the master bath.

They were covered in filth, had wallpaper glued to the glass, and the rail & stile joints were coming apart.

So in the summer of 2013, I set up on the driveway and got to work.

After I fixed, scraped, and cleaned everything, they sat for a long time.

Finishing the attic was higher on the priority list.

At least they didn't sit in a pile of stuff.

They moved around a bit to stay out of everyone's way during other projects, spent a little time acclimating to the new space, and eventually got hung, temporarily, in their new permanent home.

As we got closer to completing the master bath, it became time to focus some more love and attention on the doors.

They were removed to make it easier to get the cabinets and tub into the room.

And then down to my work shop to get a fresh coat of Impervo.

And frost the glass.

Unlike previously, this film allows light through because it's not completely opaque.  In addition, it doesn't require adhesive, so it will be easier to remove. It's applied with water and adheres via static cling, so when the time comes it just peels off.

Next caretaker - you're welcome.

While the doors were off I did the dowel and glue treatment to the screw holes for the hinges on both the door and the door frame.

And finally, yesterday, I re-hung the doors.

The crystal knobs are smaller versions of the door knobs in the rest of the house, but are new from House of Antique Hardware.

Sunday, December 20, 2015

More Hardware

We've been slowly finding various other things for the master bath.  You'll start to see them scattered about in future photos.

Packages have also started to arrive with various bits of hardware that were missing.  Some bits have already been installed; others will get their own updates here soon; still others have yet to be shipped from the vendor...

The towel ring and toilet paper holder that match the plumbing fixtures in the master bath were a little more expensive than I had in mind.  We managed to find these at a more reasonable price.

They don't "match"; rather, they "coordinate".  That's a principle we've lived by throughout this journey.  There are places in the house that need a more simple colonial-revival feel, where others can stand to be a little more ornate.

The master bath is one of the places that can stand up to the extra detail.

Tuesday, December 15, 2015

The Tipping Point

This time last year we had a minor tragedy.

The Christmas tree fell over several times.

And the top made a decent scrape on the wall.

Which I still have to repaint.

When we buy the tree, we just walk onto the lot at Frattalone's hardware on Grand Avenue and buy the tallest one they have. Takes us all of 5 minutes to pick out the tree.

We have 10-foot ceilings on the first floor and because we put it in the opening in the staircase anyway we're not really constrained by height.  It also doesn't matter if it has a flat spot because we stick it in this corner and can orient it to hide any asymmetry.

That's probably why we had the tragedy last year.  The tree was too tall and unstable for the stand we had.

So we got the Hummer of tree stands for this year.  Note that in the photo this thing is on a 6-foot diameter rug.  It also weighs as much as a decent sized Sumo wrestler.

That should keep us from reaching the tipping point this year...

Saturday, November 21, 2015

Plumbing

The plumbing became quite the saga over the past couple of weeks.

A while back the plumber came and installed the toilet, shower heads, and lavatory faucets.  He was missing parts for the tub and hot water recirculator, so needed to come back later.

As part of checking things out during the install, a bunch of crud came out of each fixture.  He took it to get tested and it tuned out to be lime scale.  After investigating to determine the source, it turns out that the water heater was way past its useful life and a third full of mineral deposits.  I guess I shouldn't be surprised, it's one of the few remaining appliances that we hadn't yet replaced.  So he ordered a new one to be installed when they came back later to finish the tub.

A few days later I happened to be down in the basement gathering stuff for another project and noticed a decent sized puddle in the corner where the drain lines for the sinks were.  I checked the pipes themselves for the source of the leak with no joy.  But I notices they tapped into the drain for the old kitchen sink in the basement.  Now, that drain probably hasn't had a sink connected to it since before the 1980s.  There's no telling whether it works or not.

Turns out not.

When they came back, they tried to snake it with no success.  So they re-routed the pipe in the basement over to where it could catch the stack for the toilet.  Problem solved.

They also finished installing the tub, the water heater, and the hot water recirculator.

Texting SWMBO at 7pm the night before to see if the electrician (me) had installed the outlet for the pump caused a bit of panic.  I had to do some quick planning and run to the store to get parts that night.  I got it only half installed, so ran an extension cord until I could finish it up the next night.

The bathroom is now totally functional and in use.  And it's nice to have instant hot water.

We don't have window treatments, yet which explains the builder paper on the bottom sash of each window and the fabric samples taped to the casing.  I don't need the neighbors getting too excited every time I'm in here...

This morning I finished installing the crown molding at the top of the corner cabinet.  It took longer than expected because during the installation I mis-measured and cut the pillars too short.  As a result I had to fabricate a filler piece for each side and shave it down to the correct thickness.

Now that we've seen the sashes in different types of light, I know I have to do a second coat on each one.  Hence the tape still on each pane of glass.  I have to re-install the bathroom doors and they have to be painted too, so I'll do the rest of the painting in one shot.

Sunday, November 8, 2015

Mirrors

Back when we found the new sconces for the kids' bath we also found the mirrors for the master bath.  They've been patiently waiting to be installed. Yesterday I was finally able to install them.

We decided to go with matching mirrors over each of the sinks and a different one over SWMBO's makeup area.

The ones on either side had the hangers mounted symmetrically, so installing them was a breeze.  The center one, however, was a pain.  It doesn't have any straight edges and the hangers weren't mounted symmetrically on the back of the frame.  It took some mucking about to find the center-line and measure off of it to get everything plumb.  And similarly with the tom-line to get it level and set at the appropriate height.

As you can see, the plumber was here earlier in the week installing the plumbing fixtures.  Faucets, shower heads, and toilet is done.  The tub isn't quite done yet (see its reflection in the rightmost mirror) and a drain pipe is leaking in the basement, so there's still a bit of work to do...

And I'm slowly checking off items on my punch list, so it won't be long now...

Knobs

Over time, the knobs on the doors of the vanity in the kids' bath have slowly been breaking.  They are made from cheap pot metal and if anything hits them at an odd angle, they break off.  This photo is from the construction phase in the kids' bath; you can see that the molding under the wainscot cap isn't completely painted yet.

I'd briefly thought about trying to repair the knobs, but quickly realized it wasn't worth it.  There really isn't a good way to do it that will withstand normal wear and tear.

So we looked around at a few stores and found some different ones as replacements.  They have a similar color tone and detail.  The decorative escutcheon couldn't be re-used, so I'll have the fill the nail holes.  We'll also have to hit the cabinet with a little furniture polish or something to minimize the "ghost" lines from the perimeter of the escutcheons; they are mostly just from the collection of dust.

And while we were looking for replacement knobs, we were also looking for knobs for the master bath.

We needed 19 of them.

The ones on the cabinet doors went in fairly quickly; it took me perhaps a total of 10 minutes to install the ones on the 5 cabinet doors.

The ones on the drawers were a different story...

It took about two hours to install those.  The drawer face is not an integral part of the drawer box, so each face came off. Then I could locate the position of the knob, drill the hole, install the knob, and re-install the drawer face.  The face is adjustable so that you can align them properly, which had to be done anyway, so it wasn't that big of a deal.

Saturday, October 31, 2015

Master Bath - Part 16

We're getting closer.

Thursday the countertop got installed along with the sinks.  We looked around at different options including engineered products, but decided that a natural stone product was the way to go in this room.  Crema Marfil was it.  It has just enough variation to be interesting without getting too wild.

While we were waiting for the counters I did all the preparation for the millwork: sand, fill the nail holes, sand again, prime, and caulk the gaps.

Friday I took the the day off  and started painting the millwork which is why you see all the builder's paper and tape everywhere.  Hopefully I'll finish bathing everything in Impervo today.

Sunday, October 18, 2015

Sash Ribbons (Tapes?)

Once again, our house is special.  I guess I knew that already, but here's another reminder.

The topic of "Never before seen sash 'ribbon'" came up on The Historic District recently.  The person posting the question had only seen double-hung windows balanced with cord or chain, never a metal ribbon or tape.

Double hung windows need some mechanism to keep them open.  There are a number of different ways to accomplish this, including some sort of counterbalance mechanism.  Typically a sash cord runs over a pulley near the top of the window opening.  One end of the cord is attached to an appropriately sized weight and the other is attached to the sash.  The sash end is usually knotted to that the knot fits into a mortise in the edge of the sash and doesn't come loose.  Sometimes, sash chain is used rather than cord.

Occasionally, you'll see a "tape balance".  Rather than a pulley, a spring-loaded cartridge is mortised into the jamb near the top of the window.  The cartridge and spring will be sized for the weight of the window and play out the proper amount of metal ribbon.

Our windows use a normal counter-weight and pulley system, but use a metal ribbon instead of cord or chain.  Apparently, this is rare.

The first photo shows a broken ribbon from a couple of years ago when I was restoring the Music Room.  Note that the face of the pulley between the flanges is flat; evidence that it was meant for ribbon rather than cord or chain.

The next photo shows how the ribbon is attached to the weight inside the weight pocket.  It's turned back on itself to make a loop for the weight hook.

The last photo shows how the ribbon is attached to the edge of the sash.  It's turned back on itself around the buckle which is then pressed into the mortise so it doesn't come loose.  There's a small nail whose head also helps keep the buckle in the mortise.

The sash ribbons in the kitchen are steel; a magnet will stick to them.  I haven't tested the material on the other windows, though.  The ones in the latter two photos don't look like steel to me.  Doing some internet searching, apparently the ribbons were made out of one of two materials: steel or aluminum-bronze.

Over the period we've been in the house I've tried to find a source for the ribbon, but have so far struck out.  If you have any suggestions, please let me know.

Saturday, October 17, 2015

Master Bath - Part 15

After installing the corner cabinet yesterday, I worked on the base moldings today.

The baseboard is a simple poplar 1x6.  Those were installed before lunch.

Little Man "eased" the edge with some sandpaper while I went to the Big Green Box to get various supplies for later.  Those included wood filler for all the nail holes and construction adhesive for attaching the base molding between the vanity cabinets. I can't nail there for fear of puncturing the radiant heat manifolds...

After lunch, Little Man and I installed the base cap.  I'll check in the morning to see whether we need any base shoe in here or not.

I also filled all the nail holes before supper; the filler has to cure before I do anything else.  Then sand off the excess filler and I can begin priming everything.

Friday, October 16, 2015

Master Bath - Part 14

All week I've been messing with this corner cabinet. And I finally have it mostly installed today.

By mostly, I mean that the crown molding still needs to be installed. Otherwise it's done.  I'm going to practice my miter cuts on the base moldings first, though...

This corner cabinet is actually four pieces, which explains the messing about all week.

The four parts are:

  • the center part with the shelves and door
  • the toe kick
  • the two wing pillars
The cabinet guy, Sean, was nice enough to provide some cleats cut at 45-degree angles for attaching the wings to the main cabinet.  I had to dry fit things several times to measure where additional cleats needed to go on the walls, both behind the wings and at a 45-degree angle behind the shelf unit.  The cleats gave me something to screw into to attach the whole assembly to the walls.

Now, on to the base moldings!

Tuesday, October 6, 2015

The Big Orange Box

I suppose I should have given this post a different title.  It was supposed to be about how to "scribe" the strip that goes between the cabinet and the wall.  Otherwise you end up with an uneven gap along the wall, as in the first photo.

That process is well described elsewhere - just google "scribe cabinets" and it will return a bunch of links (this one even shows how to make your own scribing tool!).  Done right, the strip, in this case the pillar, matches up perfectly with the profile of the wall resulting in no gap.

I ended up using my daughter's compass from geometry class because they sell a cr@ppy plastic one that won't hold it's setting at The Big Orange Box.

Also, I have a nice jack plane (big one in the photo), but wanted a one-handed block plane to do this scribing.  The only one they carried at The Big Orange Box was a "cheap" one (small one in the photo), so I had no other choice.

I wasn't thrilled with the performance of the little one, so I used my big one; the quote "this is not a precision tool" comes to mind.  Perhaps it will work better if I hone the cutting edge before its next use, but should I really have to mess with a new tool to get it to work right?

Then, to get the spacing uniform between the cabinets, I wanted some thin shims to use as spacers.  These would have been perfect.

So I went to the store looking to buy a few.  Ten should have been more than enough.  But as you can see, they come in bundles of one hundred.  There were several broken bundles in the store so grabbed what I needed and headed to the checkout.  I caused much puzzlement with several cashiers.  You see, the individual shims are not marked with a UPC barcode.  The could sell me 10 shims at the "bundle of 100" price.  Each!  That's $84.30 for those that are math challenged...  But dividing the case price by 100 was apparently too complicated.

Needless to say, those babies are still at the store and I found a different way to accomplish my goal.

I wonder if I'm going to have the same problem with these.  I need only one and The Big Orange Box only sells them in bags of twenty five...

I'm in there so often, the staff should shout my name when I walk in, like Norm from Cheers...

Perhaps my 76 cents will get spent where I can "Save Big Money"...

Man, I miss Seven Corners already.

The Cass Gilbert Experience - Post Postscript

During the tour, one of the guests asked about a website that talked about plaster repair.  I pointed them towards Big Wally's Plaster Magic which is a product I haven't tried yet, but will be soon.  There's a spot in the master bedroom that this should work for.

Now I find out the guest on the tour was actually asking about where I'd heard about the product (though that wasn't really communicated very clearly).

So if you're out there and reading this, the two forums were Old House Web and Wavy Glass.  I wouldn't bother with either of them, though; they've both been overrun by spammers and are now zombies.

A better place to find other old house lovers, blogs, and tips is thehistoricdistrict.org.

Monday, October 5, 2015

Master Bath - Part 13

Last week, the correctly made piece of glass arrived for the shower surround.  The installer came back and installed it, along with the shower door.

The door swings both in and out, but we'll have to be careful that it doesn't hit the shower valve or head when we swing it in.

During the week I dry-fit the cabinets along the one wall before fully installing them over the weekend.

Since these have a pre-installed front apron in the toe kick, leveling was a bit different than normal.  Normally you'd shim-up the low side, but the floor drops half an inch over the width of the cabinet on the left.  It would look pretty funny to have a half inch gap under the "foot" on one side.  So I shaved some off the bottom on the other instead.

Scribing the pillars to the wall on each end didn't take too long, though.

However, it was a lot of messing about to get the gaps between each piece to be uniform so that the whole assembly looked right and spanned the length of the wall.

Now that these are installed I can move to the corner cabinet that will be directly behind me in the second photograph.

Wednesday, September 23, 2015

Master Bath - Part 12

Last night I installed the old kids' bath sconces in their new home; the master bath.

I don't know that I'd go so far as to say this room is cursed, but everything is late.

The cabinets should have been here already, but they missed the truck.

Some of the plumbing fixtures must be made of unobtanium by Bavarian elves, because they're still not here even though we ordered them in the previous decade (OK, I jest, but we ordered them many weeks before the claw foot tub which has already been delivered).

The tub has it's own story, though.  We'd picked one out online. Sometime between when we selected it months ago and went to purchase it, it went up in price by 30%...  Fortunately we found something similar through a local brick-and-mortar vendor, Star Supply, at roughly the original price target.  Now I just have to figure out how to get a 350 pound cast iron tub up the stairs...

And the glass for the shower surround wasn't made correctly.  The installer was here twice, but no cigar (and not his fault).  A new piece of glass is on it's way apparently.  The hole for the clamp that holds the pieces of glass together at the corner (brass piece in the photo) isn't in the right spot.  They forgot to account for the thickness of the glass that's perpendicular.

Those with a sharp eye (!) will note that the walls have been painted in the meantime.  The same artist that did the entry and dining room ceiling did the walls with a Venetian plaster-type finish that ties back into the neighboring dressing room.

The blank spots on the walls are where the cabinetry will go, once it arrives... perhaps tomorrow...

Tuesday, September 22, 2015

Yet More Sconces

Back when we did the kid's bath we needed some sconces.  We found four at a local salvage place (Art and Architecture), but we had to take all four even though we needed only three.

That was a stroke of luck as it turns out.

Because we need four in the master bath.

We looked around at various salvage and antique places in town to no avail.    We ended up finding these new ones at Creative Lighting.  Reasonably priced and coordinate well with everything else in the room.

It took a while for them to come in, but they finally arrived a week ago.  Just in time for me to install them prior to a party.

No surprise there...

They are a little less ornate as well, but that's good for this bathroom.  The extra detail in the previous ones will go perfectly in the master bathroom.

Pics of the previous ones in their new location coming soon!

Monday, August 24, 2015

The Dining Room Ceiling

For a long time we've been thinking of doing something interesting in the dining room.  All the paneling on the walls is very cool, but it's all Ivory Tusk, so the only splashes of color and interest are the window treatments and knick-knacks.

One idea I threw out was to cover the ceiling in gold leaf.  I'm not sure exactly where I've seen it before, but I thought it would be interesting and reflect a lot of light throughout the room while still giving it a warm glow.

The artist that did the entry ceiling came back last week and did the dining room as well.

It is a mixture of silver and gold which is really interesting and is much "softer" than a monochrome gold would be.

The room is less stark and now has a much warmer feel to it.  It also feels much cozier, even for a big room.

I had to touch up some of the crown where her tape pulled the paint off, so it's a good thing I saved the old cans.  The paint was all dried up but I was able to get back to the correct store and get them to match the paint exactly.

Tuesday, August 18, 2015

The Front Entry

There were several projects underway in the run up to the tour.

One that I was not responsible for was the front entry's ceiling.  The heavy lifting was done by an artist.

All I had to do was remove and re-install the light fixture several times.

The first time I forgot that this light is on a 3-way switch.  That meant I shocked myself several times before I figured out why the wires were still hot.

I'm apparently a slow learner.

The Cass Gilbert Experience - Postscript

Saturday's tour went well.  There were about 25 people on the tour.  We received a lot of very nice compliments and feedback.  The group had quite a few questions.  Fortunately no one was able to "stump the band".

One popular question was who our florist was and where the flowers came from.

The answer is SWMBO and the Saint Paul Farmers Market...

Wednesday, August 12, 2015

Master Bath - Part 11

It's been a busy few weeks so I apologize for not posting.

We installed this chandelier over the weekend.

Yes, there's a chandelier in the master bathroom.

I need say nothing more than...

SWMBO.

Eventually the claw foot tub will be located directly underneath.  Of course, I used a dimmer switch so she can dim the lights and soak.

The chandelier was a "inherited" from her aunt and uncle.  It used to be in their dining room.  After they both passed, none of the cousins had a use for or wanted it, so they gave it to us.  Once we figured out the plan for the "master suite", we knew right where it would end up.

And it looks fabulous even if I say so myself.

The Cass Gilbert Experience

A reminder that a handful of spots are still available for The Cass Gilbert Experience tour this Saturday August 15.  Proceeds go to the MN Historical Society.

In addition to our house, the tour also includes the Pioneer Endicott building.  A very interesting structure designed by Cass Gilbert and home to his Saint Paul office for a period.

Saturday, July 25, 2015

Master Bath - Part 10

After the screed cured for the weekend, Nate installed the uncoupling membrane.  It isolates the tile from the underlying floor, letting them move independently and minimizing cracks.

It's installed using thinset and once it dries, another coat of thinset can go on top.

And after that dries, then the tile can be installed.


And grouted.

A little bit of touch up here and there, plus the soap dish, and it's all done.

Wednesday, July 22, 2015

The Looming Deadline

In an earlier post I mentioned a looming deadline; it is The Cass Gilbert Experience.

Well, we're not going to be done in time.

Nate is doing a great job progressing on the tile.

But some of the other stuff won't be done.  We've ordered the cabinets and plumbing fixtures, but they won't arrive until after the event.

And we had a little surprise this morning.  A local TV station came to film the house for a piece on the event.  If you want to see it, watch TPT's Almanac on Friday July 24 at 7pm.

Saturday, July 18, 2015

Master Bath - Part 9

Earlier in the week I pressure tested the radiant tubing. Fortunately there were no leaks.  The biggest worry are the tubing joints and the danger of puncture when you're fastening the tubing.  This system doesn't require stapling the tubing, so that risk is a non-issue.

I couldn't get a true pre-assembled manifold to fit in the available space, so I had to build my own (seen in the first picture). I have only two loops, so the manifold is only a "tee", thus limiting the number of joints.  I reality, I don't have more joints than I'd have had with a manifold.

Nate installed the screed on Friday.  Many buckets of mortar screed got carried up the stairs.

Reports are that he liked it a lot.  According to the manufacturer the foam panels result in a 15-20% weight savings in mortar.

Now it cures for the weekend and floor tile can be installed next week.

Monday, July 13, 2015

Master Bath - Part 8

Nate finished tiling the interior of the shower on Friday.  So I got the weekend to install the hydronic in-floor heat.

I didn't quite make it.

I'd previously forgotten to install the thermostat for this zone.  That meant drilling some more holes and fishing the control wire down to the basement.

Then I could start on the underlayment for the screed.  It's the Bekotec system from a company called Schluter.  These 2x4 interlocking foam panels are cut to fit and laid out on the floor.

Once they were all in place, I installed the hydronic tubing.  The "studs" on the panels hold the tubing in place for the most part.  The only place it didn't really work perfectly is where I made 180-degree turns.  The tubing has a tendency to lift the edge of the foam panel a little or not lay perfectly flat.

The tubing manufacturer (Nibco) has a design service that I took advantage of to get a material list.  They recommended routing the tubing on 8-inch centers.  The studs on the foam panels ended up pushing it out to 9-inch, which is close enough.

The black wire is the floor sensor for the thermostat.  It shuts the system down if the floor gets too hot.

You can also see that I've run two loops of tubing to ensure that the heat is even across the whole room.

Also, I didn't run tubing close to the right-hand wall in the second photo because the cabinetry will be directly above; there's no sense in heating the floor under the cabinets.

I was only able to get the first loop done over the weekend; the second loop I finished tonight.

Now I'm ready for Nate to comeback and do the screed.  That will probably be later in the week after he finishes another job.

Thursday, July 9, 2015

Master Bath - Part 7

Nate has been making good progress with the shower tile this week.

We'd originally planned to use a basket-weave pattern much like in the kids' bath, but it's out of stock for the foreseeable future.  Nate found this pinwheel pattern as an alternative and it works really well.  The basket weave was a bit bigger scale than the kids' bath and this tile is a bit smaller scale.  It will actually work out better because, like a siped tire, there are more edges and it will be less slippery when it gets wet.

After the floor, he started on the walls.  It is a creamy-colored, large-scale subway tile.  The shower is fairly large and this is a decent sized room, so it can handle the larger scale.

The niche back is covered in a small-scale running bond mosaic.  You'll see more of that in a moment.

The benches are made from the same material as the backer board and are going to get covered with the tile that's going on the floor in the rest of the room.

Today, he finished all the subway inside the shower.  The "panel" surrounding the shower heads and valves is the same mosaic as in the niche.  It has a matching "pencil" that separates it from the subway tile.

Tomorrow subway tile will get installed on the exterior and top of the shower wall.

It's looking fabulous so far!

Wednesday, July 8, 2015

Scavenger Hunt

The girls were gone over the weekend, so there was discussion on social media whether the boys would get anything done or goof off.

Well...

Stuff got done.

Friday evening was spent paining the master bath ceiling.

A while back I'd installed an inexpensive washtub and faucet in the basement so I had a place to clean out paint brushes, etc.

Well, it turns out the faucet was not only inexpensive; it was cheap.  It started leaking all over the place so I had to get a new one.  Replacing it was the Saturday morning project.

The kitchen faucet in the carriage house hasn't been working well for a while.  A new one got installed.  Removing the old one was a pain in the neck.  Both literally and figuratively.  And that was the Saturday afternoon project.

In the evening I went on a scavenger hunt to find the door casing for the master bath.  It's all around here somewhere, but it took a while to find all the right pieces.  Then I scraped and sanded to get them ready for a new coat of paint.  And installed them so the tile guys had a reference point.

And now I know where most of the window casing is for this room.