Thursday, May 30, 2019

The Window Well

Included in the scope of the foundation tuck-pointing was taking a look at the foundation around the window well. There had been some concerns about the wall above the window well and the foundation needed to be investigated.

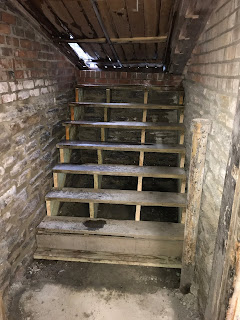
The concrete skim coat on the cellar entry had cracked and was starting to come loose so that was removed (see the stone foundation wall at the far end of the window well).

The concrete floor was removed.

And a lot of dirt was removed (see the big piles, duh).

The foundation was inspected and no issues were discovered, which is a good thing.

They also sent a scope down the drain to make sure it was intact, connected, and working properly.

Once again, everything checked out.

So the dirt was replaced and compacted.

Class-5 was brought in to provide a solid base.

And new concrete was poured.

And the foundation wall between the window well and cellar stairs was tuck-pointed.

And all the foundation tuck-pointing is done.

Tuesday, May 28, 2019

Tuck-pointing - 4

The only thing left in the basement is the root cellar.

These two exterior walls were coated with some other material that mimicked plaster. Part of it had begun to crack, bow out from the wall, and fail.

The masons pulled some off carefully to determine what was going on. They determined that it all needed to come off and the stone foundation re-pointed.

This a current in-progress photo. Once they are done, we plan to leave the stone foundation exposed. It's too good looking to hide behind some other material. We also plan to add open shelves for storage. I don't think it will truly return to being a root cellar, though.

Monday, May 27, 2019

Ash Pits

While they were tuck-pointing the foundation walls, the masons also did the fireplace foundations.

This is the foundation under the study fireplace. In addition to the tuck-pointing, you can see where they replaced a few brick that were in rough shape. The hole is the access to the ash pit and this one is missing its door. The door was in pretty rough shape due to moisture because this pit contained a fair amount of wet ash and other debris. The moisture means that this chimney will need to be tuck-pointed soon and probably needs a new cap as well.

This is the foundation of the living room fireplace. Again you can see quite a few brick needed to be replaced. It's also much easier to see where tuck-pointing was necessary. The ash pit door is still intact, though. Though this pit was dry, it was completely full.

I mean completely full.

As in, when you opened the door the ash was packed in the pit and there was no space at the top of the opening. I wonder if this pit has ever been emptied...

For this one alone I must have spent at least an hour shoveling ash into 5 gallon pails so SWMBO could carry them out to the dumpster.

Every time I pulled out a shovel full, more would fall down from above.

And as I was moving buckets around I managed to whack my head against the pump for the heating system. I just rubbed some ash in it to stop the bleeding & keep my last remaining brain cell in my noggin' and kept going. The cut was too small to require a visit to the doctor, but it was a little tender while washing my hair for a week or so.

The third foundation doesn't need a picture. It looks much like the other two, but most of the brick was fine. It had very little ash in it for some unknown reason. It is the pit for the dining room and master bedroom fireplaces.

Cellar Stairs - Part 2

The masons completed the tuck-pointing in the cellar entry earlier in the week.

Looking ahead to the forecast, the plan was to move Mulch Mountain when the weather was nice (Thursday - Sunday) and save the stair rebuild for when the rain started.

As you can see from the photo, the cellar doors aren't exactly weather tight, but they are good enough to keep me mostly dry for this project. As an aside, my dad built these doors what seems like a million years ago. We'll need to replace them again soon.


Here's a closeup of the tuck-pointing. Of course, the stone foundation is below grade and the brick is above on the exterior.

And here are the finished stairs. One type of fastener used consistently throughout.

The stringers are new, but I reused the treads. The face of the bottom step's rise was also re-used.

I created a "thrust block" of new stock that's up against the ends of the stringers, but below the facing on the bottom step. I used 12" spikes driven into the ground to make sure it doesn't go anywhere. It's a more traditional way of securing the stairs than the funky contraption that was there previously.

The drainpipe at the right used to connect to the downspout back in the day. I assume it goes to a cistern somewhere, but it's not been connected in a very long time.

Cellar Stairs

The brick and stone walls of the cellar entrance also needed tuckpointing. To give the masons access the walls in the cellar entrance I had to disassemble and remove the cellar stairs. These sorts of projects are always an adventure. I did the demolition a couple of weeks ago.

Once again I discovered another project where somebody was apparently experimenting with a wide array of fasteners. Most of the treads were attached to the stringers with a framing nail at the back and a phillips head screw at the front. Interestingly, not all the nails were the same size. In addition, there were at least two screw sizes present as well.

Because there's not really a good way to attach the top of the stair to anything, there was a wooden support structure in place. It used mostly square drive screws, though only about half were actually driven into the material far enough to engage the other board. A handful of phillips head screws were also used. The heads of all were stripped. As a result, I couldn't remove any of them, except by using a sawzall...

After pulling everything apart, I was chucking the pieces onto the driveway so I could store them in the garage, out of the way of the masons. Several of the stringers broke because they were made from 2x10s. And they overcut the throats where the rise and run meet.

The top board is the old stringer and the bottom one is the new stringer I made Sunday after I finished moving Mulch Mountain. Note the difference in the amount of lumber between the notch and the edge of the board. Also in the top board, note the cuts past the corner of the notch, weakening what little lumber is left.

Here's a different angle showing the entire stringer. On the left is the new one. They are the same length. The optical illusion is because the one on the left is made from a 2x12 and is going to support my weight...

Tuckpointing - 3

Earlier in the spring when the weather was bad, the masons called. It was hard for them to do outside work because of the weather. He had previously estimated all the work we need. Knowing that we need some foundation work in the basement, he asked if we were ready to go. He'd give us a discount so he could be inside and keep busy during the bad weather.

Everything had to get moved to the center of the basement and covered to try to minimize dust getting into everything. We primarily used the basement for storage. There's really no reason to turn this into finished living space.

Once everything was moved to the center of the room, then they went to town.

The photos show the work in progress. The joints have been cleaned out and some of the new mortar is in place.

Sunday, May 26, 2019

The King of Mulch Mountain

Thursday we had 15 cubic yards of mulch delivered. That's half as much as last time, but then it's only been two years and we need only to top-dress what's already there.

Our fourth-born decided to be King of Mulch mountain early in the process.

We spent a few hours Thursday evening spreading mulch, followed by a few more hours Friday evening, and half a day Saturday.

By Sunday morning his kingdom had significantly eroded and he was sad.

His realm disappeared entirely by mid-afternoon.

Along the way we replaced two dozen or so 3-5 gallon shrubs that had expired.

Over the past couple of weeks we also planted several hundred annuals.

And the King and his pals, along with a tough winter & cool wet spring, have forced me to re-seed and over-seed several times to try to get the lawn back. There's not much else I can do at this point; the deadline is too close.