Friday, December 23, 2011

Music Room - Part 5

I made it - it's done!

I painted the doors yesterday and re-hung them this morning.

While waiting for the paint to dry we moved all the furniture back, hung artwork, etc.

Other than the kids' bedrooms, this is the only room where all of the furniture came from our previous house.

Now I just need to put away all the tools, etc before the family comes over tonight.

Thursday, December 22, 2011

Music Room - Part 4

I started on the music room back in July.

Life and other things conspired against me, so this has taken longer than expected.  It was my father-in-law's favorite room, so I'm sad he's not here to see it nearing completion.

It took forever to get the woodwork prepared for a new coat of paint.  I tried to disturb as little paint as possible - before starting I'd tested the paint for lead and the top coats were fine, but the oldest coats were lead-based.  So I followed the new EPA guidelines, just to be safe.

The room was an off-white color with a peach undertone.  We've gone to a historic color called "Georgian Green".  It's similar to one of the early woodwork colors in this room.

The ceiling effect is similar to a cloudy sky.  It is made up of several layers.  Two are the same as the woodwork (Ivory Tusk) and the other two are a metallic silver.  I did the first two layers and got frustrated, so She Who Must be Obeyed did the final two layers.

Some of the screws for the window and door hardware were missing or broken (what a surprise!).  So I've had to go to Seven Corners to get various replacements.  Thus the need for more antiquing solution to get the new brass bits to look like the old brass bits.

Hopefully I can get the last bit done tomorrow to meet my goal of having it done by Christmas.

Kid's Bath - Part 13

The linen cabinet arrived last week.  Bill and Johnny picked it up from the cabinet maker, painted it, and installed it.

It looks great and is a pretty good size.  The tall ceilings make it appear shorter than it actually is.

I had to scramble around a bit - I'd forgotten about knobs. I found some at Rockler while I was up there getting some more solution for antiquing brass (for my other ongoing project; blog post coming shortly).

We're nearing the end of this project.  All that's left is for me to install some window hardware.

And the tissue-paper window treatments have to go....  ;-)

Kid's Bath - Part 12

Mirrors!  We finally have mirrors!

We'd ordered some online a while ago.  A long while ago.  After several days, we received the *first* email from the vendor saying something along the lines of, "We value customer service and have received your order.  We anticipate that it will ship on [... some date about a month in the future]."


As the estimated ship date rapidly approached, we received a second email saying something along the lines of, "We value customer service.  Your items are anticipated to ship on [... some date about a month in the future]."

Really?  Good customer service is two emails in the span of a month with no explanation as to why the items are delayed?

So I had She Who Must Be Obeyed cancel the order.  There's only so many times you can shave without a mirror before you slice off some important part of your face.

And I went searching...  and found some different ones at Just Vanities.  So I placed the order.

And within *minutes* I received a response saying that they'd received the order, the items were in stock, and we should receive them within the week.  Oddly, there was no mention of "valuing customer service."

The next day I received another email saying that the items had been picked from the warehouse and would be shipped shortly.  Again, there was no mention of "valuing customer service."

The next day I received another email saying that the items had shipped.  Late in the evening I checked the tracking number, assuming that they'd just have started their journey.  I was surprised to see that they'd already arrived at the Fedex facility here.  Again, there was no mention of "valuing customer service."

They'd shipped them overnight at no cost.

But it gets better.

When we opened them the next day, they looked better in person than on-line and really tied things together in the room.  But... one had a manufacturing defect; the paint was bubbled along the edge of one of the frames.

So I called their customer service line.

The person said that they would ship out a replacement.  And that we should keep the old one; if the manufacturer wanted it back, they'd send a pre-paid shipping label to us within two weeks.  If not we can dispose of it as we see fit.  Again, there was no mention of "valuing customer service."

The replacement arrived within two days  Again via overnight Fedex.  At no charge.

It is interesting to contrast the behavior between the company that started every correspondence with "we value customer service" and the one that never mentioned it once.

Saturday, November 12, 2011

Kid's Bath - Part 11


There a a few things left, but it's done enough that it can be used.

It's great to finally have a real shower.

With water pressure!

We're waiting on the linen cabinet, a little window hardware, and the mirrors. I can't recommend the place we bought the mirrors from yet - they've been slow and haven't communicated much.

The vanity came from Premiere Vanities, the plumbing fixtures from Faucet Direct, the sconces are vintage from Art and Architecture, and the ceiling fixture from Creative Lighting.

The fan is amazingly quiet.

I love the in-floor heat.

Click on the photo to get to the album that contains more pictures of the finished work.

Friday, November 4, 2011

Literature and Life

Not only is it fun to have a house with a name, it's also fun to see it mentioned in various literature.

I stumbled across another reference to our house recently in Minnesota 1900: Art and Life on the Upper Mississippi, 1890-1915, by Michael Conforti.

It's good to see that the house is always cast in a positive light.

I hope we can do it justice.

Thursday, November 3, 2011

New Switches


The latest packages arrived from House Of Antique Hardware and Kilian Hardware.

When we moved in, most of the switches were of the standard kind. One stood out however.

In the Music Room, there was an old push-button switch. It was very cool and had a nondescript brass cover-plate covered by many coats of paint.

We decided to go back to push-button switches in the "public" areas of the house. The twist is that we found more decorative cover-plates. We also found some dimmer switches that mimic the old push-button switches.

So in my spare time I've been installing these as well. They coordinate well with the antique sconces.

Wednesday, November 2, 2011

New Sconces

We've never been enamored with many of the sconces in the house. They (top photo) sort of look like someone found a 24-pack on sale at Home Depot.

We've found some replacements at antique and salvage shops over the years and have finally finished enough re-wiring so that they can be controlled by switches in convenient spots.

The fun part about hunting for stuff is that you can find sets that work for an area, but don't have everything "match" all over the house.

While the electrician was here for the bathroom, he installed a few (bottom photo) in the main staircase and second floor landing.

These look much better.

Tuesday, November 1, 2011

New Dishwasher


We got a new dishwasher today. It would be nice if the story was that simple.

As usual, it's not.

The old one didn't really wash the dishes; it just got them wet. Not really a surprise.

A few weeks ago, we took advantage of a sale at Warner's Stellian and bought a dishwasher on sale. We paid the extra $100 to have them install it. That way I could concentrate on other projects.

Yeah right.

The delivery guy/installer showed up (on time!) and started to remove the old one. He noticed that the drain pipe for the sink was in an odd place.

As in, it didn't run down inside the wall to the basement. Rather it ran half inside the wall and half protruding out from the wall. Not a huge deal except that it then made a turn and ran away from the wall 8 inches and the top half of the pipe stuck up through the floor.

In the middle of the cavity for the dishwasher.

Newer dishwashers need the floor to be flat, not have some 8 inch length of 2" ABS pipe sticking up an inch out of the floor. Smack in the middle of the opening.

Oh yeah, and the surrounding cabinets were installed before the floor was tiled. So the opening is at least a half inch shorter that is normal.

So the thing had to be slammed like a low-rider.

Needless to say, it couldn't be installed as-is, so he gave up.

So I got to spend my Saturday re-routing the drain pipe to do it the right way. So much for working on other projects...

And while I was doing that, I found what's pictured.

Yup, this is the shut-off valve for the water line to the dishwasher and sink.

Note - I haven't touched the compression nut that (sort of) attached the the water line for the sink.

Really.

The compression nut is just hanging out doing nothing. It's the corrosion around the joint that held things together and kept it from leaking.

So I replaced the shut-off valve too.

And the guy came back to install the dishwasher today.

No problems. ;-)

The Attic Bathroom


This is the attic bathroom. It's the one I re-plumbed before we started remodeling the Kid's Bathroom. It's also the one we've been using during the remodel because it's the only one with a working shower.

Originally, this would have been the servants bathroom, so it's not fancy or big. But it does work. And since I ran new water lines, it has good water pressure and hot water!

Kid's Bath - Part 10


The bathroom is almost complete.  Primarily what's left is some final painting!

Since the last post the initial coats of paint have been applied, vanity was installed, shower door was installed, and the finish electrical and plumbing have been completed.

Saturday, October 15, 2011

Sometimes you have to learn the Hard Way


Bill and his guys had drained the radiators so they could remove the one in the kid's bath. He stuck around for a few minutes yesterday to show me what I needed to know to bleed the radiators. So I splurged on the 99 cent radiator key and got to work.

A couple of the radiators in the attic went off without a hitch. Another couple did not. I could get the bleed valve open, but nothing would come out...

So I went to the second floor and started doing those. I finished all of them without any trouble.

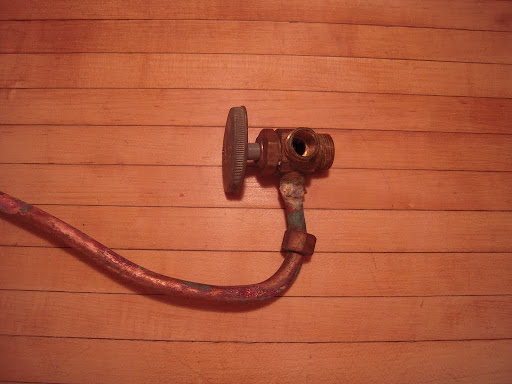
Then I remembered that the back bedroom radiators are disconnected. And there are shutoff valves where the lines go up to the attic (see picture). It's obvious that's why nothing came out of the other attic radiators - the valves are closed!

What's not obvious is *why* the valves are there at all.

One might assume that they are to shut off the heat in the attic. After all the previous owner was living here alone and there would be no need to heat the attic.

And one would be wrong.

So I gently opened the valves and listened to make sure I was hearing all the right noises (or not!). I also checked for leaks around the joints and valves.

It was looking good. So I went to the basement to check the water pressure in the boiler and add more water. When everything was looking good there, I started back upstairs.

And as I passed by the basement workshop, I heard water dripping...

Not a little bit.

But like Niagara Falls.

So I sprinted up the stairs.

And Niagara Falls is flowing down the walls in the kitchen. I haven't messed with the radiators there yet, so I know this isn't the source.

So I sprint up the stairs to the back bedroom.

And 
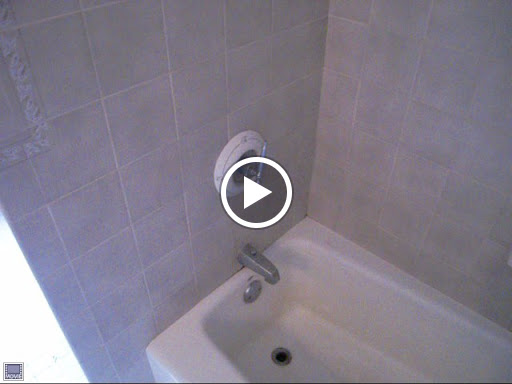
Niagara Falls is flowing down the wall above the window in the picture.

So I sprint up the stairs to the attic and...

Nothing. No water. Anywhere.

So I run back down to the back bedroom and shut the valves. And Niagara Falls quickly subsides. Obviously there are holes or cracks in these radiator lines somewhere in the ceiling.

Everything cleaned up fine, but this was excitement I didn't need.

And now I know why this room looked like a disaster zone when we moved in. It's OK though, we'd planned to gut this room to the studs anyway. Now I have some entertainment to look for when we open the walls.

Kid's Bath - Part 9


We're getting closer...

All the tiling is finished. The marble cap on the shower curb went in and everything is grouted. It's amazing how much different it looks once its grouted.

All the mudding is done as well. Now we've got nice smooth walls.

All the wainscot is in, but only the first piece of the cap is installed. The other two pieces and the base shoe are next.

Wednesday, October 5, 2011

Kid's Bath - Part 8


We're getting close on the tile!

The inlay on the back wall of the shower is done, as is the nook on the side wall, and the bench with its Big Slab of Marble. I'll need that when I shave my legs...

And the floor got grouted today.

So, I think all that's left for tile work is to install the shower threshold and grout the shower.

Sunday, October 2, 2011

Kid's Bath - Part 7


By the end of the week, lots of things had happened.

In-floor radiant heat was installed

Sub-floor poured.

More tile was installed on the walls and floor of the shower.

And on Friday, all the floor tile was installed.

Tuesday, September 27, 2011

Kid's Bath - Part 6


Tiling has begun!

The backer board for the tile was installed last week.

The shower threshold and mud bed went in yesterday, as did the first bit of tile on the side wall of the shower.

Most of the remaining bits of the side wall were tiled today.

We're starting to click along...


Wednesday, September 21, 2011

Kid's Bath - Part 5


All the plumbing rough-in is done.

Sheetrock is all installed.  Mud and tape started today.

A cool little feature in the shower was framed up today.  Keep watching for what this turns into...

Last week all the plumbing fixtures arrived.  Today the vanity was delivered.  All of the plumbing fixtures are new.

We've chosen the lights, but still have to pick them up.  They'll be a mixture of vintage and new.

Saturday, September 17, 2011

Kid's Bath - Part 4


It's the end of week 2.

Framing for the shower wall is complete and the sheetrock is installed on the dry side.

Sub-floor has been installed.

Next up:
- finish the last of the plumbing rough-in - shower valve and head
- prep for tile

Wednesday, September 14, 2011

Kid's Bath - Part 3


Any wonder why there was no water pressure in this bathroom?

It's amazing water could get through this pipe at all.

The radiator under the window came out today, so all the demo is done.

The electrical rough-in is done and the inspector gave it a passing grade.

All the plumbing waste and vent rough-in is done, but the new supply lines are 85% done. Once the new shower framing is done the supply lines can be finished, too.

As always, several new photos have been added to the slideshow.

Saturday, September 10, 2011

Kid's Bath - Part 2

At the end of week 1 - all the demolition is done and most of the electrical rough-in is done.

There are a couple new pictures in the sideshow, but it will take a sharp eye to notice the differences.

While Bill and his guys are working on the Kid's Bath, I'm still plugging away at some other projects.  This morning I visited my friends at Gopher Plumbing Supply.  The Big Box stores don't stock part for 90 year old toilets like this.

And now the attic bathroom is fully functional.  It's not pretty, but it will work until the Kid's Bath is done.

I'm also still working on the Music Room - ceiling got painted tonight.

Wednesday, September 7, 2011

Kid's Bath - Part 1

Demolition is underway.  The slideshow has pictures from the end of both days.

Day 1 - vanity, toilet, tub/shower, mirror, linen closet, and the tile on the walls.

Day 2 - floor tile and some plaster/sheetrock.

Now that stuff is exposed we can confirm that plumbing and electrical wasn't done properly.  That's no surprise given some of the symptoms we'd seen in the past, along with some others not mentioned previously:
- in the winter when you flushed the toilet all the water would get sucked out of the traps for the sinks and tub/shower
- the switch for the bath fan didn't do anything ; which was OK because...
- the fan just blew into the attic instead of outside
- wiring that's not run through studs, just stapled to the edge
- studs/joists that are half-cut randomly

If there's a way to break a construction code, it 's in this room...

Did I say I'm glad we're doing this?

Monday, September 5, 2011

Kid's Bath - Part 0


Demolition starts tomorrow!

And I am very excited.

I went on strike and vowed never to replace any burned out bulbs above the vanity.  It's a good thing they all didn't burn out before we started this project...

The open stud wall in one the before pictures is where I framed in the useless doorway to the adjacent room. The adjacent room is now the family room.

As you can see, the design of this bathroom doesn't really coordinate with the rest of the house.

We're going to fix that.

Sunday, September 4, 2011

Gettin' humid


Prior to hooking up the water in the attic bathroom yesterday, the kid's bathroom had the only working shower in the house.

Watch the video.

You don't get wet; you just get humid...

Q - Why temporarily hook up the water in the attic bathroom?

A- Because demolition starts this week on the kid's bathroom...

Saturday, September 3, 2011

Gettin' dirty in the attic


I spent much of the day getting dirty in the attic. Back when I re-plumbed the laundry room, I'd disconnected the water supply to the bathroom in the attic. Someday we're going to gut the attic and figured it wasn't worth it to hook up the water temporarily.

Well... we decided to hook it up temporarily anyway.

The reason why will become apparent soon enough...

Fortunately, the back wall of the bathroom is adjacent to the unfinished space in the attic. Hooking up new water supplies was much easier from the back of the wall.

No holes required.

Just pull off the insulation and go.

I pulled out only the parts of the supply line I could easily get to and replaced them with new PEX (color coded, of course). When doing the laundry room, I'd already run the hot and cold trunk lines to the attic and capped them off. Just tap into them and...

Voila.

Working bathroom.

Mostly.

Like everywhere else, the toilet needs a new fill valve and the seat/lid are nasty and need replacing.


My lucky day!


The french doors to the study and music room each are missing a crystal door knob (at bottom). Probably they were broken long ago and all that's left is the brass part of the knob.

Because they are for the french doors, the knobs are smaller than a regular knob (top left). That also makes them really hard to find. I've been searching high and low for 3 years for reproductions or originals to no avail...

On a whim we went to Art and Architecture the other day. It has a ton of cool stuff that's been salvaged from all over the place. The clerk thought they only had small round knobs and said they get a few octagonal ones every few years. As I was rummaging around looking for other stuff, I stumbled across across a bin that had a few crystal knobs in it.

And there were two that appeared to be exactly what I was looking for (top right)!

The brass collar at the base is slightly larger than the existing knobs, but I can enlarge the hole in the rosettes to make them fit. And they take a fine-threaded shaft where the existing ones use coarse thread, but one of the knobs came with the proper shaft. So I can pair the two new ones and pair the existing ones together.

So I have the parts and a plan to b executed later...

Monday, July 4, 2011

New Sash Cord

I finished putting the window together last night.

If the window wasn't 40 inches wide, you could open it with one finger.  That's a testament to the way they were built originally (including the proper sash weights), not the way they've been maintained over the years.

I still have a little work to to to get the bottom sash to close completely.  Looks like the last time the window was apart, somebody didn't get the weather strip along the bottom installed in quite the right place...

Sunday, July 3, 2011

Broken Sash Ribbon

One of the windows in the Music Room has a broken sash ribbon.  After doing some research, I've discovered that these metal ribbons were used in place of cord on higher-end windows of the period.  It's amazing that these have lasted over 115 years...

One had broken previously  and been replaced by some stranded metal cable.  Ugh.

Some of the window stop screws were stripped so they nailed the window stops in place.  Double ughh.

They were blind as a bat and missed the nail (see hammer indentation next to the nail hole in the top photo - putty knife blade is against the nail and under the hammer mark).  Triple ughhh.


They used gigantic nails (bottom photo).  There's a special place in my heart for these people  ;-(

Because I can't find sash ribbon any more, I'll have to use sash cord.  And, of course, I over-estimated the weight of the windows and bought the wrong sash cord - it's too large for the pulley.  So I'm heading back to the hardware store.

That's OK though, I drilled & doweled the old holes for the stop-screws and the glue needs time to dry.

The Music Room


My next project is the Music Room. The slideshow will get updated with new photos as things progress. Right now it contains the (almost) before pictures - there are a few things we've already done.  Originally there was no ceiling fixture in this room; we had the electrician wire for one and move the chandelier in here from the main hall. You can also see some sample paint colors on the wall. And, of course, we had the floors refinished when we first moved in. Mostly, this room just needs paint, but there are a few other things as well...

Those with a sharp eye will notice that the walls at either end of the room are curved. According to a local architect, Gilbert did it for acoustical reasons.

This is the room where callers were brought to wait for the lady of the house (assuming she was receiving visitors). We're going to decorate it in line with it's original purpose, so this room will have a much different feel to it than the more masculine Library.

Sunday, June 12, 2011

Done?

Almost done.  Again this year we planted to polka music from Deutsche Tage across the street.

All the shrubs and most of the trees are in.  Two trees have to wait until the utilities are marked tomorrow - I'm not interested in cutting the gas line...

We'll also have to re-position some perennials and fill-in more perennials in a few spots in this front garden.

The foundation plantings on the sides of the house will still have to wait until the tuck-pointing is finished.

Thursday, June 9, 2011

More Landscaping


More landscaping is on the way.  These are just the "before" and "during" photos for the preparation phase.

The hedge was a bit past its prime.  I didn't bother trimming the hedge this spring knowing that we'd be removing it anyway.  When I trimmed it last year, there wasn't must foliage left and it looked pretty sad...

The new plants are coming this weekend.  I'm gonna be digging some holes...

Tuesday, February 15, 2011

Antique Leather


Here's a close-up of the final coat in the Study Bathroom. It's an antique leather treatment.

The base coat is the lighter color (same as the color in the study). The top coat is a darker brown mixed with 3 parts glaze. The glaze mixture is rolled on the wall and then covered with a thin plastic sheet. The plastic sheet has been pre-crumpled and then laid out mostly flat on the wall. When the plastic is removed, some of the glaze mixture is removed with it. The creases and folds in the plastic cause different amounts of glaze to be removed, giving this effect.

Study Bathroom Re-Plumbing - Part 4


I finally got it all put back together tonight.  Yesterday I checked with Gopher Plumbing Supply for the new toilet parts.  Unfortunately, they didn't have the right parts for this brand.  Kudos to them, though; they recommended a competitor just down the road that carries parts for that brand.

Star Supply had one of each in stock, I picked them up this morning, and installed them tonight.  Everything works like a champ!

Monday, February 7, 2011

Study Bathroom Re-Plumbing - Part 3


After some distractions, I finally got back to this project. I took Super Bowl morning to paint the room. The color is an historical color, Audubon Russet, that's the same as the study. And it is one of the colors in the painting on the door.

Though this picture is after the second coat (compare with a before photo), we're not done. Which is why drop cloths are on the floor and nothing is re-installed, yet...

Monday, January 24, 2011

Study Bathroom Re-Plumbing - Part 2


Sunday I started removing the supply line for the toilet. To get access, I had to remove the toilet. And I suspected the foul odor was coming from the wax ring under the toilet. Sure enough I was right...

The supply lines came out with a little coaxing and the new PEX ones are already installed. Now I'm just patching the holes during the week.

All the valves and seals were shot on the toilet so I'm replacing them, too. Including the tank-to-bowl seals you can see in the picture.

The picture shows what was on the wall behind the toilet tank. It's a cool historical record of the decorating in this room.

I have no idea why the wall was initially painted black. Next is some very dark floral wall paper - slate gray with dark green and burgundy. Over that is some light green and cream floral wallpaper. After that, the walls were apparently painted a taupe/cream. And, finally, white.

If you look closely at the previous entry's photo, you can see some places on the wall where almost all of the wallpaper was removed before painting. We'll get that cleaned up before we decorate in here. We have something interesting in mind...

Study Bath Re-Plumbing - Part 1


The water pressure has been a bit low in the study bathroom. And every once in a while we get a foul odor from near the toilet. So, it's time to do some re-plumbing...

I'd already replaced the old galvanized supply trunk with PEX when I'd re-done the laundry, so this isn't going to be that hard.

Saturday, I punched a couple of holes in the wall to remove the old galvanized supply lines for the sink and toilet. Note that the valve on the hot supply line is starting to fall apart between the shaft and the housing (top shut-off valve in the picture). It's too bad the old lines are badly corroded on the inside; these old shut-off valve are cool looking.

I had only a couple of hours between other commitments so was glad to get the sink's lines removed and the hole punched for the toilet.

Monday, January 17, 2011

Servant's Toilet


When I re-plumbed the laundry room, I disconnected the water to this toilet. It was the "servant's" toilet in the basement. Not a very glamorous setting...

Whenever I'm working in the basement and have to use the toilet, I have to run upstairs. I've gotten tired of that, so figured it was time to reconnect this one. And it's good practice for some other plumbing work that's coming soon.

The toilet was working before I disconnected it, but it took forever to fill because the old galvanized supply line was full of mineral buildup and corrosion. I ran the new PEX supply line (left of the toilet in both pictures) and installed a shut-off valve. Now there's a concept - now we have the ability to shut off the water to a single fixture instead of the whole house!

Then I connected the supply to the fill valve and turned on the water. And the supply valve didn't work. And worse yet, it leaked (note water on the floor in the "after" picture). The old one and gaskets are shot.

So off to the home center to get a new fill-valve assembly.

Drain the tank. Install the new valve. Turn on the water.

The new fill-valve works and doesn't leak. Woohoo!

But the flush-valve ball is leaking AND the flush-valve is leaking around the base. It's no suprise that the ball is leaking; it appears to be ancient and the rubber has disintegrated. The gaskets around the base of the flush-valve don't look right to me though... Off to the home center again. I find the new ball easily enough, but cannot find the right gaskets. The salesman suggests I try a plumbing supply house. Of course, they are closed until Monday.

I end up at Gopher Plumbing Supply with the entire valve assembly and gaskets. The salesman doesn't think the gaskets look right either, but gets me replacements that match.

I install them and, of course, they still leak.

So back I go and they hook me up with the right gasket and...

No Leaks!

So that's what I get for assuming what's there is the correct part. How many times am I going to need to learn this lesson with this house? Oh yeah, and there were two of the wrong gasket ($1.49 each). The right one (flush valve shank washer) costs $2.59.

Didn't someone once talk about doing it right the first time???

While I'm at it, I clean the bowl & tank. And I remove the old, nasty seat and replace it with a new one. And find a generic lid that will keep junk from falling into the tank.

Sunday, January 2, 2011

GFCIs and The Dark

This morning, I'm in the bathroom and SWMBO turns on the WaterPic.  The GFCI trips and the lights...  go out.  Then I hear a noise that sounds like little plastic pieces bouncing across the floor in the dark.  Hmm...

  1. tripping a GFCI outlet shouldn't cause the lights in the room to go out (obviously *that* work was never inspected...)
  2. the reset button on a GFCI outlet shouldn't go flying around the room like the jumping light bulb from that scene in "The Return of the Pink Panther"
Off I go to get a new GFCI outlet.

And I can't wait to remodel this bathroom.