Saturday, June 25, 2016

The Gentle Curve

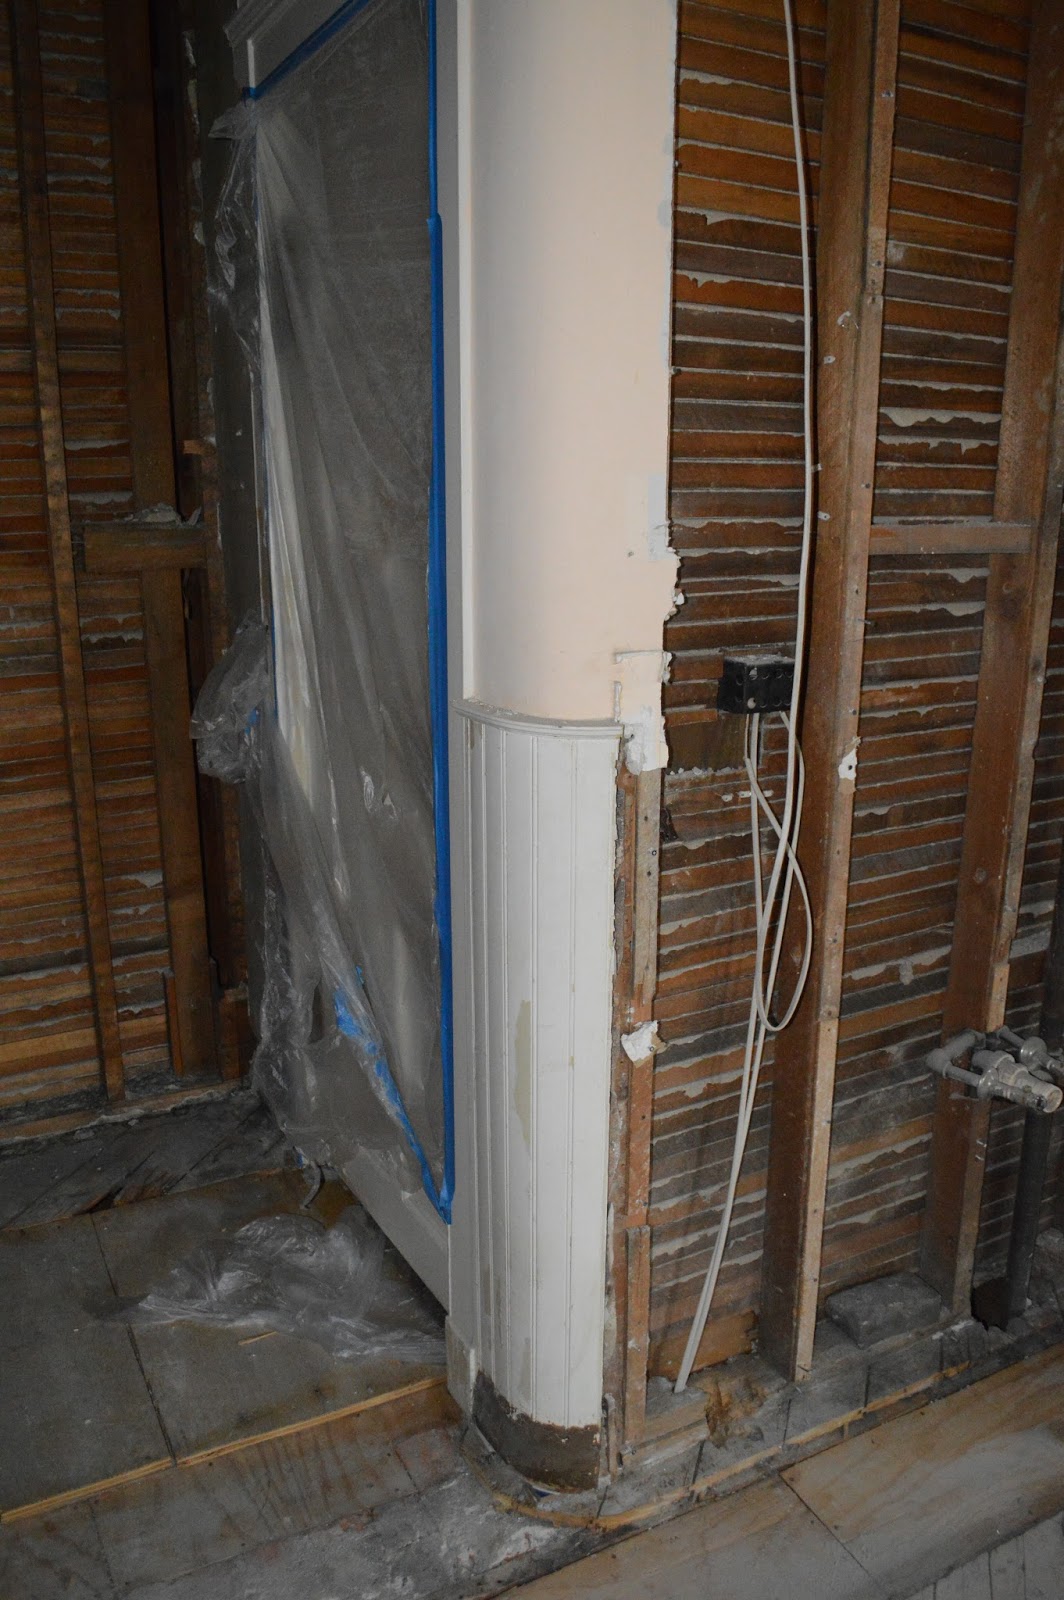
This is the gentle curve that inspired the handful of similar corners in the attic.  We're going to try to preserve this if we can.

The wainscoting also served as the inspiration for the little bits of wainscoting in the attic and the kid's bath.

As a spatial reference, the plastic sheeting  left of the corner is sealing the doorway from the kitchen into the dining room.

Wednesday, June 22, 2016

The Water Main

The plumber has been here this week removing the old plumbing in the kitchen and starting on the new. That includes some work in the basement to straighten things out. Most of the drain and vent work was done last week.  This week it's been the water supply.

Some of the supply lines had been replaced over the years, but the main hadn't been replaced in a long time.  It was still galvanized pipe with a gate valve. In the picture you can see the gate valve from the house side of the meter post-removal.

It was in pretty sad shape.

You can also see some of the other chunks of galvanized pipe that were replaced while he was in there.

We'll get a little better flow now...

Friday, June 17, 2016

Kitchen - Week 3

This week the framing was largely completed on the walls and ceiling.  Now they are all level and plumb.

Exterior walls were framed out in a way that allows any other mechanicals (plumbing and wiring) to go between the studs and the brick. The technique of running the studs perpendicular to their normal orientation preserves as much of the space as possible while still allowing for insulation.

The ceiling was also made level (to a consistent height throughout the room!) with nailing surfaces 24" on center.

The plumber was also here to put in the drain and vent lines. Both can be seen sticking up in the center of the room where the island will be located eventually. Along the wall between the two windows you can see where the plumbing vent is run between the framing and brick

Tuesday, June 14, 2016

The Temporary Kitchen

The wet bar in the attic was intended to also function as our temporary kitchen during the construction.

There's no cooktop or oven, but we can always use the grill.  We also purchased an electric frying pan that we can use in a pinch. And as luck would have it, we have quite a few graduation parties to attend this spring and early summer. If your kid is graduating this spring, we thank you... ;-)

While the guys were doing the demolition last week, I was installing the appliances during the evenings.

The dishwasher is finally hooked up and working in its new permanent home.

After being craned up through the window, the refrigerator is also in it's new permanent home.

After the kids leave for college, I'm never leaving the attic!

Sunday, June 12, 2016

Kitchen - Week 2

Demolition continued this week and is largely done.  All the plaster and drywall are gone. So is most of the extraneous electrical and plumbing.

The fist picture is  the view from the doorway towards where the range and sink were.

The second is the view towards the southwest corner of the room.  The radiator under the leftmost window has been removed as well.

The fancy new laser level will help get the floor and ceiling level.  Leveling both is extremely important in a kitchen, especially since our cabinetry will go all the way to the ceiling.

The sub-floor needs some work as well. Note the joist bay just camera-side of the step ladder. that wasn't done properly previously and someone has already gone through the sub-floor. You can hide it when you float a mud bed for tile, but it all has to be done properly now since we're doing a wood floor.

And here's another spot that needs repair/leveling.

Since demolition is done, construction can start next week!


Wednesday, June 8, 2016

Here Comes The Boom - Revisited

The plan had always been to move the existing fridge and dishwasher from the kitchen to the attic.

After we moved in the old ones didn't last long, so we had to purchase new ones. We knew that we'd eventually do a full kitchen remodel so the replacements were decent quality. We planned to eventually move them to the wet bar in the attic. Much measuring was done to make sure they'd fit and could get up to the attic.

Well, there was a miscalculation when the knee wall and bookcase were put in at the top of the attic stairs.  The fridge got all the way up the stairs, but couldn't make it between the knee wall and the ceiling at the last turn.

We discussed several options:

  • buy a new fridge for the attic and dispose of the existing one
  • take the knee wall and bookcase out, get the fridge into the attic, and then rebuild/re-install the bookcase and wall
  • crane it through an attic window
Turns out hiring a crane to hoist it through the attic window was the least expensive option...

Last night I got it all hooked up and we're making ice!

Now to get the dishwasher installed...

Saturday, June 4, 2016

Kitchen - Week 1

Demolition started on Tuesday.

Early in the week the cabinets were removed, followed later by the sheet rock covered plaster on the walls.

Friday part of the ceiling was removed as well.

Now we finally have a view into why the ceiling height wasn't consistent across the room.

The wall for the butler's pantry contained the waste line for the old master bath. When that wall was removed, the waste line need to be re-routed (towards the right in the exposed joist cavity closest to the camera). The way it was re-routed required more height than a 2x12 in the joist cavity. So they dropped a 2x6 below each joist in that half of the room.  As a result, we'll be able to remove all the 2x6s and get the entire ceiling back to its proper height.

As I mentioned above, there was a layer of drywall over some of the plaster walls. When the drywall was removed, this wallpaper was revealed.

More updates will come as things progress.

Thursday, May 26, 2016

Saving The Best For Last

We've started packing up the kitchen because next week the demolition starts.

To kick things off right, here are some before pictures from various angles.

First is from the doorway into the back hall looking to the southwest corner of the room. The base cabinets under the window are essentially useless because they hide a large radiator that is completely ineffective in heating the room. This fridge is being moved to the attic's bar area. We're going to re-wire the chandelier because we found its mate in a pile of crap in the attic. Watch for it to re-appear with its mate in the after pictures...  ;-)

Next is the view from the doorway towards the southeast corner of the room. The arrangement of the sconce to the cabinet left of the window means you can't really get into the cabinet... The "broom closet" next to the fridge existed because it wrapped the  plumbing stack for the old master bath. Now that we've relocated the plumbing stack the entire wall can be flush. You can also see the change in ceiling height from where this was changed from 2 rooms into one in the 1980s.  Once we get it down to the studs we'll be able to determine the new ceiling height and have it be flush throughout. Note the awesome work triangle. NOT!

Next is the view to the east toward the dining room. The bump-out on the right, where the range is currently, is the back side of the dining room fireplace.  We have a plan to work around that - stay tuned...

We're hoping to preserve the soft curve and wainscot that leads to the bi-swinging door to the dining room and the china hutch that's furthest from the camera. This soft corner and wainscot was the inspiration for the similar soft corners and wainscot that's sprinkled in the attic.

Next is a view from the current sink location back toward the doorway to the back hall. Where I ripped open the stud cavity, you can see the tubing for the in-floor radiant heat in the master bath above. We're going to ditch the radiators and install in-floor radiant heat in this room, too. The plan is quarter sawn oak flooring that's consistent with the flooring in the public spaces in the rest of the house. Originally I'm sure the butler pantry and staging kitchen would have had fir floors, and I think Gilbert would be OK with us using oak based on modern entertaining methods.  With modern entertaining the kitchen is  a public space after all...

Last is the view to the west from the bi-swinging door to the dining room.  There's not really much else to say.

Except that I wish we could find a way to salvage the glass door fronts.  The carcasses of the cabinets they're in are not original so they are no great loss.  But the doors with their wavy glass are very cool. We've been trying for 8 years to find a way to re-use or re-purpose them with no luck. :-(
Sunday, May 8, 2016

Kids in the Hall

As always, there was a deadline. We had our moms  and sister-in-law over for Mother's Day supper tonight.

That's not the only reason that I wanted to get the halls painted, but it was a good one.  And I spent a good part of the weekend in a close relationship with the halls. And now that there's some color on the walls, I can see all the places where my patching was substandard. No problem though, this was always intended to be the first coat of paint rather than the last...

The first photo is a view down the back hall from the back door.

The millwork and stairs still need work, but we're one step closer.

Compare to what it looked like before.

Real soon now that kitchen is getting demolished...

Saturday, May 7, 2016

Got My Mojo Workin'

In a previous post I mentioned that I had to patch a bunch of holes in the hallway walls. It took a while for a variety of reasons, but I'm finally done.

Last weekend I was able to prime everything and paint the ceilings.

This weekend I'm putting the first coat on the walls.We're using a traditional color called "Asian Jute" which, for continuity, is the same color we used in the front hall.

I like to listen to music while I paint.

Every once in a while things line up.

I cut in edges free-hand and the song that came on when I was doing the funky transition at the top of the stairs  was Got My Mojo Workin' by Pinetop Perkins.  Apropos; that edge turned out fantastic!

Last night I finished the 2nd floor hall.  Today I plan to finish the stairs and the 1st floor.