Sunday, December 22, 2013

It Wouldn't be a Party Without a Project

With this being the holiday season, I wasn't really working on any projects.  We've had something going most every night, so there really wasn't time to devote to the house.

Thursday night we had some friends over (Hi Mark and Rhonda!) for a lovely evening.  At that point everything was fine, but it wasn't to stay that way...

Yesterday (Saturday) was going to be a relatively lazy day so we could get ready for hosting a family gathering of 20-25 people on Sunday

Yeah, right...

Late in the morning my daughter came into the kitchen and said, "Dad, the bathroom floor is wet.  Did someone plug the toilet?"

I went to check it out and indeed the floor was wet.  But it wasn't from a plugged toilet.  The tank had cracked and was slowly dripping onto the floor...

If you look closely at the picture you can see the crack.  It runs from just above the flush lever down to the lower left corner of the tank.  You can also see the discoloration in the base tile where the water's been drawn up into the tile.  We'll have to see what happens to that when it dries out...

Needless to say, my lazy Saturday turned into a project day.  I had to quickly do some on-line research to see what toilets were in stock locally, pick one up, and install it before we went to my mother-in-law's for the evening.

I managed to get it all installed and one of the guests got to "christen" it this morning...

Friday, November 29, 2013

Mind The Gap!

Weather-stripping isn't really meant to seal gaps more than an eighth-inch.

So the way to solve this problem is to shrink the gap.

In an ideal world, I'd move the jamb over where it's supposed to be.  But that would mean filling a gap in the base molding next to the door.

Piecing in 3/8-inch chunks of a 4-part base molding is Not Feasible.

Fortunately, I found a big box store that carried flat trim that will work to fill the gap.  It is the right width, can be cut to length, and is mostly the right thickness.  It means the reveal from the jamb to the casing is off by a little bit, but that's something I can live with for "the servants' door".  This stuff is only $.30 a foot.   So $3 vs. close to $1K for a custom door; the math on that is left as an exercise for the reader... ;-)

The gap is a little narrower at the top, so once I cut it to length I scribed it and shaved it down to the right thickness everywhere.  A plane, a sanding block, and a few minutes time is all it took. Then primed it on all sides and nailed it in place.


Oh, I forgot - I filled the old screw holes and cavities from the strike plates first.  Then measured and chiseled out their new locations and...

Voila!

A door that stays closed.  With a deadbolt that works.

And, even without *any* weatherstripping, seals better than it did before.

Later I'll caulk the joint, paint it, and install new spring bronze weather-stripping.

And those are projects for another day.

Wednesday, November 27, 2013

The Ill-Fitting Door

The door to the sleeping porch...

I guess I 'm at a loss for words (which is not something that happens often on this blog...).  So I'll cover only the relevant bits here.

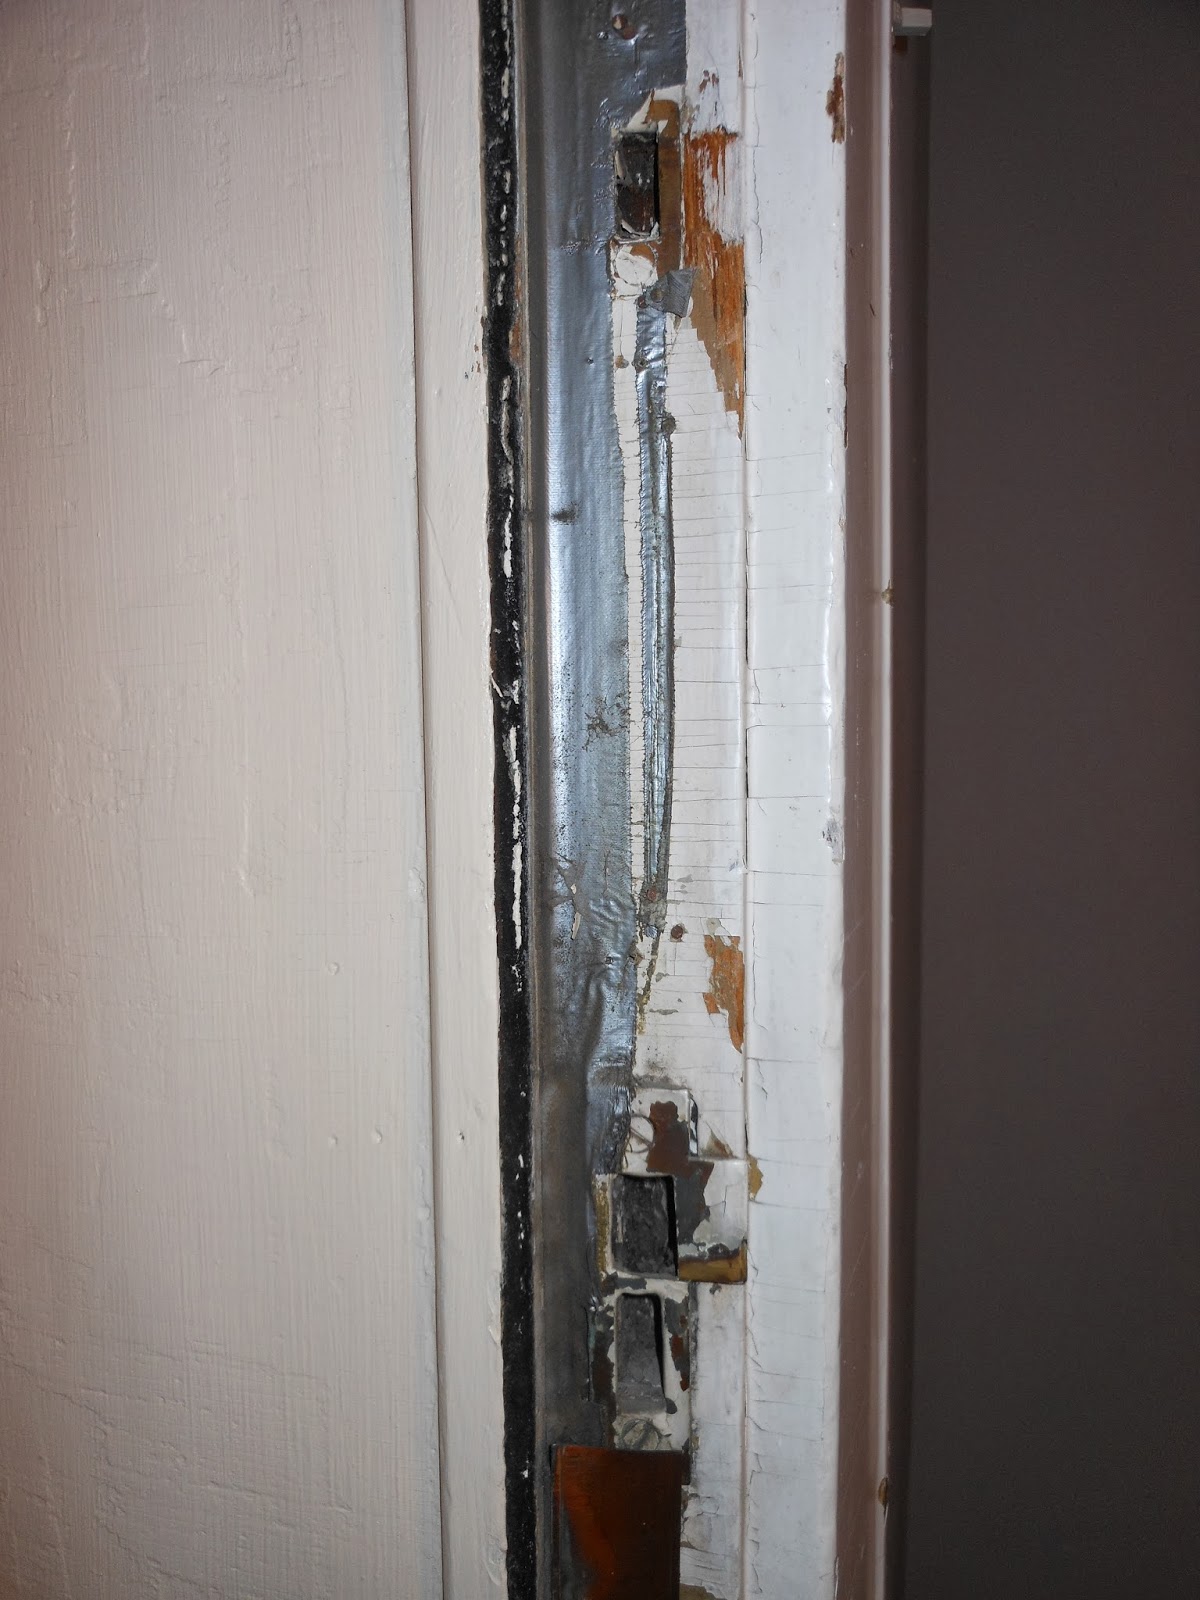
Note the giant gap between the edge of the door and the frame.  It's almost a half-inch!

It is supposed to be only about an eighth-inch.  This gap is wide enough that a decent breeze from the right direction will blow the door open.  That's awesome in the winter time.  Especially for our heating bill.

Another interesting thing is the existing weather-stripping.  This spring bronze weather-stripping is great stuff.  It seals well and lasts forever (unlike most modern stuff).

When it's installed correctly.

Note that the strike plate for the deadbolt is covered by the weather-stripping (see  the spot on the jamb missing it's paint about eight inches above the strike plate for the doorknob).  That means the deadbolt doesn't work because the bolt has nowhere to go...

Cooler still (no pun intended) is that the edge of the weather-stripping is up against the stop.  That means is doesn't flex like it's supposed to.

As I took the old weather-stripping off so I could fix this, it got better.  Behind the old weather stripping was a layer of duct tape.

I have no idea why.

One layer of duct tape isn't really enough to make any appreciable difference in sealing the half-inch gap around this door.

Oh yeah, what's this blob of electrical tape doing near the top of the jamb?

Yet another one of those things that makes you scratch your head in bemusement...

Of course, because none of this worked, several other things were added to the mix.

See that gray stuff just left of the strike plate.  No, not the duct tape, the foam rod that is tucked behind the weather-stripping below the strike and is sort-of held in place by the duct tape above the strike.

Um yeah.  That didn't work either.

So, I have an idea...

Lets add another piece of molding with a kerf so we can add a piece of felt weather-stripping as well (see black line just left of the gray foam rod).

Yeah.

And that didn't work either.

Surprising (or not!) considering that every type of weather-stripping known to man was installed on this door.

At. The. Same. Time.

I'll give them credit, at least they tried something new every time.

Still made the same mistake, though...

Saturday, November 16, 2013

Ducts!

Ducts!  Everywhere ducts!

The guys have been working over the past two weeks to get the ducts and HVAC unit installed.  They are nearly finished with the rough-in.  The HVAC unit is in the mechanical room in the center of this picture.  It's being installed with two zones.

One zone will heat and cool the attic.  The other will cool the second floor directly (and the first floor indirectly - no duct-work needs to be installed down to the first floor).  You can see the dual supply ducts running diagonally from upper-right to lower-left in the mechanical room and then off the left side of the photo.

The ducts run around the perimeter of the room behind the knee wall.  The bottom duct supplies the second floor with each vent or return being in the 2nd floor ceiling; the top duct supplies this room.  The window seats in each dormer cleverly provide a route for the duct-work.

Looks like only a day or two is left.

Monday, October 28, 2013

Intumescent - I didn't even know that was a word

Since the last post there hasn't been a lot of big progress.  Because we have another event we're hosting soon, I don't want to get anything big started quite yet.  A few things have moved forward, though.

The insulation in the attic has received it's "ignition barrier".  Most of the insulation will be covered by sheetrock which serves that purpose.  However, the parts behind the attic knee-wall won't be directly covered by sheetrock.  The alternative was an intumescent coating (a special thick paint) that serves that purpose instead.  So the attic has now passed its insulation inspection.

Next up is the HVAC rough-in.  As it turns out, we have a gas meter that's undersized considering all the gas appliances we have, let alone that we're adding another gas furnace for the attic.  So Excel is coming to upgrade the service first.  Then the new gas line can be run to the attic and the ductwork installed.  We'll be without heat until the gas line is done, so I'm glad I have those flannel jammies with the integrated feet...  ;-)

In the mean-time I've also been cleaning up various things: removing more knob and tube wiring in the basement, burping the radiators, locating & installing various interior door strike plates, and fixing the ill-fitting door to the sleeping porch.

Sunday, October 6, 2013

Repairing Rotten Wood

At the house tour several people asked how to repair rotten wood - sashes, storms, window sills, etc.

My opinion is that I want to save as much of the old wood as possible.  The wood in this house is old slow-growth wood with tight grain.  They don't grow wood like this any more.  The modern way is to use fast-growing varieties that can be quickly harvested, etc.  That means the grain is more open and it doesn't last as long when exposed to the elements.

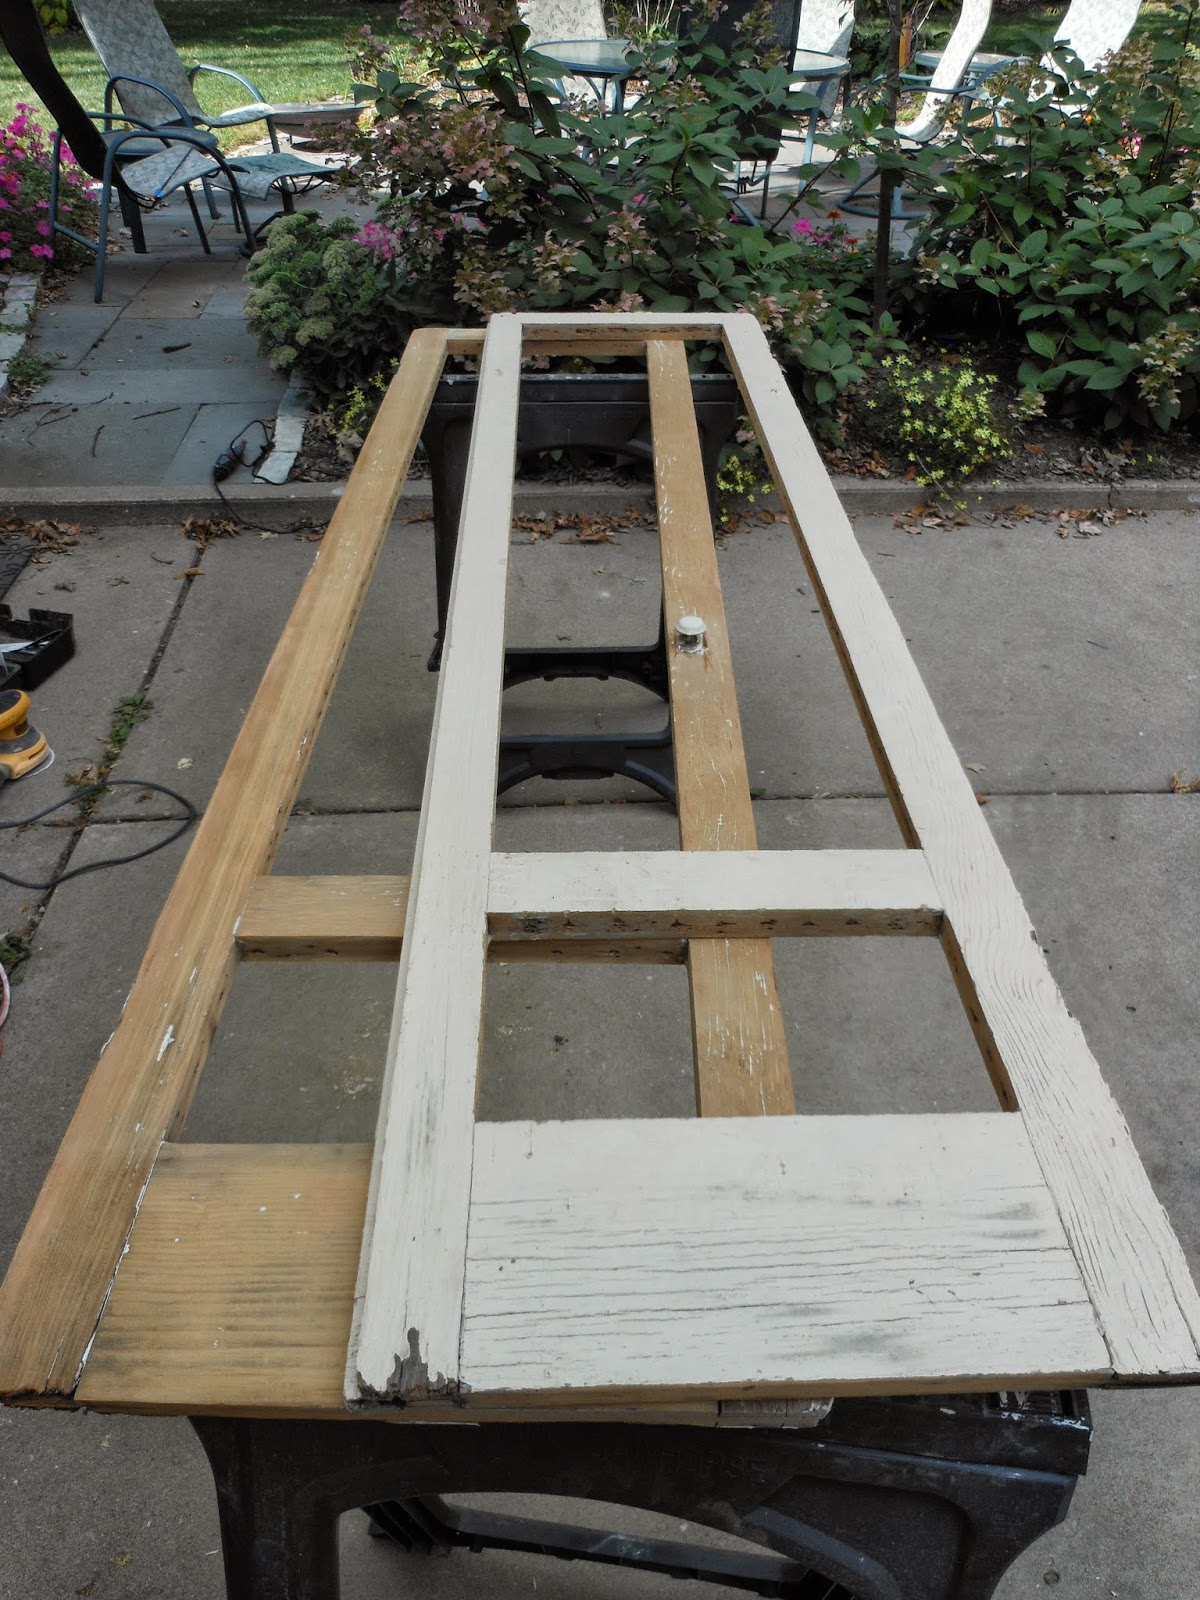
I'll use these screens as an example.  Note the rotted wood at the bottom of each stile.  The ones on the left side of photo are worse than the right.  I assume that the rails are fine because the end-grain isn't exposed.  (For those who aren't familiar with window parts, the rails are the vertical pieces that run along the side of the opening while the rails are the ones that run horizontally along the top and bottom.  Each of these screens has two stiles and three rails.)

The first step was removing all the old paint to get down to bare wood.  The bottom screen is already paint-free.  Then you can see what condition the wood is in and determine what needs to be removed and what can be saved.  Most of this wood wasn't too bad, so I didn't have to remove a lot.

The next step was stabilizing the remaining wood at the bottom of each rail.  A few people, including the guys at my favorite store, recommended a two-part epoxy by Abitron (two bottles on the left of the photo).  All you do is mix equal parts of the two liquids together and brush it on the wood, letting it soak in.  As it hardens it results in a nice stable base for the next step of replacing the removed material.

For that I used a two-part wood filler product (see the two tubs on the right of the photo).  Each of the two parts has the consistency of lightweight Play-Doh.  Simply knead equal parts of each in glove covered hands until thoroughly mixed and apply and shape as desired.

Once it has hardened, it's easy to shape and sand.  I also used it to fill the rim-lock hole in a door, so it works well in places where you're filling holes too large for other types of filler.  And here's the finished product, ready to be installed next spring.  In this photo, the screens are oriented the same direction as previously, they've just switched which is on top.  Note that the left stiles' ends are now level with the edges of the rails, even though another half-inch or so was removed from the ends compared to the first photo.

As an aside, the new triple-bead screen molding was "back-primed" before installation.  Making sure it has paint on all sides helps it last longer...

Wednesday, September 18, 2013

The Guided Tour

Welcome to the Ramsey Hill Association's house tour and the Emerson Hadley House.

This post is structured so that you can take a quick self-guided tour of the house.  The picture of each room is accompanied by a brief description and a link to a slideshow of what the room looked like when we purchased the house.

We're glad you could come on the tour.  As you approach the house, take a moment to enjoy the front garden which changes continually throughout the year.  A different plant or shrub blooms nearly every week.  The front yard has undergone significant changes over the past few years.  The Historic Preservation Commission strongly encourages low landscaping along the front of the lot.  We've incorporated their guidance and created a space with an English-garden feel, while still maintaining a link to the symmetry inherent in the Georgian Colonial house facade.

As you enter the vestibule and pass into the foyer, note the mirrored glass doors at the far end.  These doors divide the public spaces at the front of the house from the private spaces at the back. The new historic wall color helps to highlight the detail in the moldings throughout the space.  Note the incredible detail in the crown molding.  This molding isn't wood, rather it is plaster cast in place.  As far as we can tell it has always been painted which is somewhat typical of Georgian Colonial homes.

Now turn to your right and peek into the music room.  This is where the butler would have brought you to wait should the lady of the house be accepting visitors.  Note the curved wall at each end of the room that provides better acoustics.  Also note the ceiling treatment that is reminiscent of a stormy sky.  This room is painted a historically accurate color that we've found in several places throughout the house.

If you brought a calling card and the lady of the house agreed to see you, you would then have been escorted to the living room.  Please turn left and go to the living room.  The Hadley's daughter, Louise, thought this room was far too small for proper entertaining.  The sconces date to when the house was first electrified.  Originally the house had gas lights and some of the original gas lines are still present in the walls.

Now move on to the dining room.  Note the curved wall at the far end.  The windows also sport curved glass.  The fireplace surround has undergone significant restoration.  Note that this fireplace has a very shallow firebox; all the fireplaces were originally coal-burning and were the sole sources of heat for the home.  Also note the folding french doors at the entrance to and between the living and dining rooms.  Opening them fully offers better traffic flow for larger gatherings.

Now continue on to the study.  This room has a much more masculine feel than the music room.  This is where the gentlemen would have gathered to talk over cognac and a cigar  With the fireplace, this is a cozy spot in the winter.  The woodwork is original as far as we can tell and the floor survived intact because it had been covered by linoleum for many years.

At the far end of the study on the right is a hand-painted door that leads to a half bath.  The walls have been painted to simulate antique leather.  Further, the equestrian/hunting motif plays off the  paintings on the door.  This space is somewhat unusual for homes of the period, but the fixtures appear to be original to the house.  In fact, there is a nearly identical pedestal sink in the bathroom at the James J. Hill Reference library in downtown Saint Paul.

Now pause to view the main staircase.  The sconce in the seating area was found in a box in the attic.  We had it re-wired before installing it here.  Like the foyer, the old wall color didn't highlight the dramatic nature of the space.  An interesting twist is that the balusters are oriented on the bias. Climb the stairs to the second floor.  On the landing, note the leaded and curved glass windows along with the sconces.  The sconces, while not original to the house, were a fantastic antique store find!

At the top of the stairs on your left is the sand colored bedroom.  The closet is new but uses doors salvaged from elsewhere in the house to make it look original.  Note that the flooring in the bedrooms is fir, while in the "public" spaces the floor is oak.  As in the living room, the sconces are original from when the house was electrified.

On the right is the pink bedroom.  The closet is built-in and original, as is all the woodwork except the chair rail.  The chandelier was found in a box in the attic; it was cleaned and hand painted by the room's current occupant.

Now move back across the foyer to the bathroom.  This room was originally the dressing room for the lady of the house.  This room was recently gutted to the studs and remodeled to reflect a style more consistent with the rest of the house.

Now proceed to your right to what used to be the bedroom for the lady of the house.  It was connected to the bathroom by a door near where the toilet is now located.  We've re-purposed this room into a family room to adapt to a more modern lifestyle.  Sadly, the wooden floor in this room couldn't be restored, forcing this to be one of the only rooms in the house with carpeting.

Now continue on to the master bedroom.  Like the dining room below it, this room has a curved wall on the far side and the windows sport curved glass.  This used to be the bedroom for the man of the house and it was connected to the lady's bedroom via a doorway that was located roughly where the nightstand is located now.  Also note the fireplace which has undergone extensive renovation.  Sadly like previous room, the wooden floor in this room couldn't be restored either.

Now proceed through the french doors into the new master closet.  This room used to be the master bathroom.  The doorway on the right of the picture connects to what will become the new master bathroom.  It is located in the old butler's bedroom at the back of the house.

Now proceed into the back hall and turn left.  It should be apparent that you've entered a space that hasn't been restored, yet.  Compare and contrast this space with the parts that have been restored.

Continue past the laundry room and attic stairway toward the back of the house.  The attic is currently under construction and is, unfortunately, not available for viewing on the tour, though you can follow its progress elsewhere on this blog. The doorway at the back of the house leads to the second floor sleeping porch.  We found many of the old screen frames in the basement.  They've been restored and re-screened to create a great space.

Now head down the back stairs.  Pause to look in the kitchen.  It was last remodeled in the 1980s and will need to be done again soon.  Originally, this was two rooms; a prep kitchen nearest the doorway and a butler's pantry nearest the dining room.  the wall between the two spaces is denoted by the change in the ceiling height in the middle of the room.  For those who are wondering, the real kitchen originally was down in the basement.

As you proceed out the back door, take a short break to enjoy the patio.  There have been significant landscaping changes to the entire yard over the past five years.  The yard and garden were taken back to bare ground to result in what you see today.

Now enter the carriage house and go up the stairs.  This space was originally a large room for casual entertaining - there used to be a large bar that had many guests names carved in it.  There is much dispute in the neighborhood about the bar's current whereabouts.  Later the carriage house was turned into an apartment.  Now it is an office for the home's owner.

And that brings us to the end of the tour.  Head down the driveway and note the curved wall and curved glass on the way to your next stop on the tour.  We hope you enjoyed it!

Monday, September 9, 2013

More Closet Painting

You can never have enough closet space.

This one is an overflow linen closet at the end of the back hall.  Eventually the face frame and doors will be installed.  Hopefully that's done soon enough that I can get them painted before the next tour!

This closet used to open up the other way - that is, the hall side was a wall and the opening was into the room.  There was a tiny, ineffective radiator mounted on the wall.  It didn't work very well and was overwhelmed by the wind whistling in around the poorly fitting (and poorly weather-stripped) door.  The new radiator is the one that used to be in the old master bath.  It's been relocated here and the opening will eventually be covered by a decorative screen that will allow the heat out.

The door on the right side of the picture goes out to the second floor sleeping porch.

On the left side of the picture is the old location for the cabinet that's now in the master closet.  Moving that cabinet really helps open up the back hall.

The real point of this post is that the interior of the cabinet has been painted.  No rest for the wicked as they say...

Sunday, September 8, 2013

Glued and Screwed - Part 2

A long time ago I had to repair all the dining room chairs; those repair skills are handy to have for other projects as well...

We found some french doors laying in the attic. I'm not sure if these were ever installed in the house or if they came from somewhere else.  There aren't any door frames that are quite the right size and these are a bit shorter than most of the doors in the house.  They coordinate reasonably well with the french doors between the master bedroom and closet, though.  We're going to use them between the master closet and the master bathroom.

Some of the glass panes were covered with wall paper.  All of the panes had been painted.  So I spent a good part of the day peeling the wallpaper remnants and scraping the glass with a razor.

The styles had started to separate from the rails at the top and bottom of each door, so I re-glued them and screwed them together for good measure.  Once the glue dried, I scraped off the excess and sanded the doors to prepare for paint.

Now they're ready to have any excess holes filled, bare wood primed, and hung.  That will require a little extra work - as I mentioned they are 6 inches shorter than the other doors, so a decorative header will need to be fabricated.

The plan is to get these installed and painted before the Ramsey Hill House Tour.

Friday, September 6, 2013

Old School Shelf Supports

I was pressed for time before, so I've been circling back to get things done properly.

Prior to the Cass Gilbert tour, I declared the shelves in this cabinet "out of scope" to SWMBO.

On all the woodwork I've been using oil based paint.  Because of oil paint's long dry time, you end up with a much smoother and nicer finish; the brush strokes have time to level.  That also means it takes a lot longer when you're painting both sides - you can't just flip the thing over and paint the other side right away.

The shelves were no different and it took me a week to get them painted.  Tonight they got installed.

One cool thing are the old-school adjustable shelf brackets.  The supports are lengths of wood cut to fit into notches at the front and back of the cabinet.  The shelves in the study have a similar arrangement, though the notches are a different style there.